Photographers, you need them for the pictures. Most of them are nice people, but they also have some peculiarities. If you know how to cope with these peculiarities, you’ll get the optimal results from your photo shoots. To help you with this, this blog publishes a series of articles devoted to photographer types. Every single photographer is a unique person. Nevertheless, knowing the type could be useful for models. None of the observations in this article imply that a certain type of photographer delivers higher quality. Each category contains both good and bad photographers. The mere fact that a photographer is shy, arrogant or flamboyant tells us nothing about the quality of his or her work. It does tell us something about the way they work though.
Some models may think that there is no need to adjust to the photographer. ‘Let them adjust to me.’ If that’s you, let me ask you whether you care about the result of a photo shoot. If you don’t, stop reading (and you might as well stop modeling too). If you do, why not take all the factors into account that you can influence?
The flamboyant type
The flamboyant photographer dazzles into the room, spreading an air of self esteem. He or she talks a lot, mainly about some person called ‘me’ and does not seem to take the shoot too seriously. He or she does give directions, somewhere in between all the small talk. If the flamboyant photographer is of the opposite sex, he/she might even flirt a little with the model. This type is great for inexperienced models, the shoot will go smoothly, stress will flow away with the stream of words and directions come naturally. On the other hand, the endless bragging may become a little tiresome after some time.
Dos and don’ts
The easy and right thing to do is just go with the flow. Respond to his talks, admire the great things he says he has done and brag a little about yourself as well. Do however keep in mind that you are here to shoot, not to chat. It’s great to have a relaxed atmosphere during your shoot, but it is still a serious matter.
Make sure you have made some pretty clear appointments in your deal with this photographer. Especially when you do a TFP/TFCD-shoot, make sure he keeps his part of the deal. It’s not bad will, but flamboyant photographers tend to be a little sloppy in delivering on time if at all. If he’s late delivering, don’t hesitate to remind him. Again and again of needed. Clearly signal that he is not going to get away with not delivering. No need to be rude or aggressive though, he is not trying to screw you, he is just a bad planner.
About the flirting, well, don’t think to much of it. It’s probably just his way with women (or her way with men) in general and has nothing to do with you. Of course, you still set your own boundaries, but don’t be too afraid (or hopeful) of his intentions towards you. He is just going to shoot you.
Other types
The intuitive type
The artist
The shy type
The technical type
The arrogant type
The Ex-model
Wednesday, April 30, 2008
Tuesday, April 29, 2008
Landmark @ Somewhere
Suppose you’re visiting the famous place Somewhere. Obviously, since you’re there, you will visit the equally famous Landmark, as it is conveniently located just outside somewhere. And when you visit Landmark, you would be a silly photographer to go home without a picture of it, right? So, there you stand, at a pretty spot, just near Landmark, aiming your camera. Around you, you  see about a zillion tourists doing exactly that, from about the same viewpoint. Now you know, you are not going to take a very original picture.
Nothing wrong with standard pics, I am not saying that. You are not only a photographer, you are also a tourist. And you want something to remind you of the famous places you visit. But still. You also want a more or less special picture of Landmark, a picture that is really yours. Take a good look around you, the solution is probably closer than you think.
Free high res version of this picture
see about a zillion tourists doing exactly that, from about the same viewpoint. Now you know, you are not going to take a very original picture.Nothing wrong with standard pics, I am not saying that. You are not only a photographer, you are also a tourist. And you want something to remind you of the famous places you visit. But still. You also want a more or less special picture of Landmark, a picture that is really yours. Take a good look around you, the solution is probably closer than you think.
Free high res version of this picture
Photography tips: Lens and camera reviews
When you are going to buy a camera or a lens, and once you more or less figured out what type your after, the search for the best one begins. ‘Best’ obviously depends on your personal preferences as well, but you will need information. Review pages can give you this information, but there are so many different review pages. Some of them seem to be purely commercial, some are very technical and others consist of user reviews. How to find your way in this ocean of information? Let me tell you how I gather my information. I am not saying it is the best way per se, but it might be a good starting point to develop your own.
Once you know what you want, check three review sites. FredMiranda (FM) has a large number of user reviews. User reviews have the obvious advantage that they tell you how the lens behaves in day-to-day use. They have the disadvantage that a user may judge the lens wrong. The advantage of FM is that the number of reviews is quite large, so that a single misjudgment is not likely to have a huge impact. The overall score for any lens will give you a fairly good first indication, but you should read a couple of those reviews as well. Especially focus on reading the cons of the lenses and check whether they matter to you. If a lens is voted down for its noisy AF motor but is optically sound, you may not care as much as in the case of a lens that is voted down for lack of contrast.
 A second site to check is Photozone.de. They have extensive technical reviews. You may either be interested in reading the entire thing, or just the verdict, that’s up to you. Note that Photozone lists all lenses by mount. That is no problem if you are a Canon owner looking for a Canon lens, but when you are looking for a third party lens (e.g. Sigma, Tamron, Tokina etc), you may miss out on the lens you were looking for. If you are for instance looking for the Tokina 10-17 for your Canon, go check the Nikon section. Photozone tested this lens on a Nikon body, so they listed it under Nikon. If it performs well on a Nikon body, it will probably perform well on a Canon body too.
DPReview mainly tests cameras, but they do have some lens reviews as well. For cameras, you can do a feature search as well as a side-by side comparison. They also keep track of lens and camera releases, which is also nice to know.
Apart from reviews, you may also want to check some pictures taken with the specific cameras. There are many sites to do this. I would like to mention the two sites that I check out for this purpose, but others are good as well. DPChallenge has a section called equipment, where you can look for the camera or lens you are looking for. On Flickr, go to the ‘groups’ section and type the brand and focal length (brand and type for cameras) in the search box.
If you still have questions, turn to a photography related forum. Members of those froum are often very willing to help and share their knowledge and experiences. All the sites listed above have such forums, and google is your friend in finding other forums as well, or forums in your own language.
Saturday, April 26, 2008
Modelling tips: Photographer types (1)
Photographers, you need them for the pictures. Most of them are nice people, but they also have some peculiarities. If you know how to cope with these peculiarities, you’ll get the optimal results from your photo shoots. To help you with this, this blog publishes a series of articles devoted to photographer types. Every single photographer is a unique person. Nevertheless, knowing the type could be useful for models. None of the observations in this article imply that a certain type of photographer delivers higher quality. Each category contains both good and bad photographers. The mere fact that a photographer is shy, arrogant or flamboyant tells us nothing about the quality of his or her work. It does tell us something about the way they work though.
Some models may think that there is no need to adjust to the photographer. ‘Let them adjust to me.’ If that’s you, let me ask you whether you care about the result of a photo shoot. If you don’t, stop reading (and you might as well stop modeling too). If you do, why not take all the factors into account that you can influence?
The shy type
The shy photographer is more often a man than a woman. Sometimes, it seems like he is hiding behind his camera. Don´t count on a lot of directions. He probably knows what he wants you to do fairly well, but he is too shy to tell you. If he does, he will tell you in a low voice. Don´t let it scare you, you probably picked this photographer because you like his pics. He made these pics being just as shy as he is now, so he will be able to reach that level again. And maybe even a little higher, ‘cause now he’s got you as a model.
Dos and don’ts
First of all, remember that he knows what he’s doing. He simply needs a little help in the communication department. So listen carefully to the few things he says and then ask. By asking, you invite him to talk. Don’t ask the obvious though, if you do understand him right away, that’s fine too.
You can take some initiative in posing if he doesn’t, but keep checking whether it is okay with him. If he is a male, he may be especially shy to ask for a sexy pose, so try to pose a little sexier than he asks you if you feel that would lead to a better result.
It’s okay to chat a little to break the ice. Don’t just talk about you, try to find common interests. He will probably not say too much at first, but once you’ve found out what his interests are, he might open up a bit. Keep an open eye though, as his shyness may prevent him from breaking the chat to get more serious, e.g. give directions. Make sure to leave some silences in between, longer ones than you normally would while chatting.
Whatever you do, don’t try to reassure him. Yes, he’s shy, and he knows he is. He was just hoping you wouldn’t notice. Or hoping that you wouldn’t mind. Or whatever. By focusing on his shyness, you give him the impression that it bothers you, and he’ll become even more insecure. What you can do, is compliment on his work. If he has his portfolio with him or if you are looking back pics from earlier in the shoot, say you like the pics and love his style.
Other types:
The intuitive type
The flamboyant type
The technical type
The arrogant type
The Ex-model
The artist
Wednesday, April 23, 2008
Photography tips: Combining flash and daylight
 When there is not enough light to take a picture, you can use a flash. True. But it is not the whole truth. Have you ever tried using the flash during the day? It is not as silly as it may sound. In fact, in temporary fashion photography, combining flash and daylight is the rule rather than the exception.
Basic fill flash
Have you ever been shooting people in broad daylight? Did you notice the so-called ‘panda-bear effect’, with a circle of shadow around your subject’s eyes? Not a very pretty sight. Besides, a portrait where the eyes are invisible is not really a very good portrait. That’s where the fill flash comes in. It lightens up the shadows, giving you a much better portrait, as well as a little more flexibility with respect to choosing your position relative to the sun. You can either use your on-camera flash or a separate one. Harsh flash shadows, a big problem of ‘normal’ on-camera flash photography, are not really an issue, as daylight chases them away. You may want to use a ring flash, an omnibounce or a snap-on soft box to change the character of the light.
Contre jour
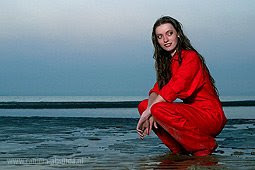
Now take it a step further. Since you are lighting your model’s face anyway, you might as well shoot right into the sun. Well, not really into the sun of course. Keep the sun behind your model and use your (fill) flash to light the model’s face and front. The sun now acts as a backlight, giving your model’s hair a nice glow. Normally, you would only get silhouette, but thanks to the flash, the front of the model becomes visible. With some practice you might even get to use the sun’s flare in a desirable way. This is a technique often used in modern fashion photography.
Let’s play around a little
Now we have two light sources, the sun and your flash. Having two light sources means you can change the lighting ratio. Obviously, there is no way you can adjust the sun’s strength, but there are other options. Most modern flash units are equipped with Through-The-Lens (TTL)-metering: flash metering occurs after the shutter has been opened and flash output is adjusted accordingly. The output of TTL flashes can be adjusted to cater for you specific needs as well. Check the third link below for a good tutorial of using the TTL-flash for fill.
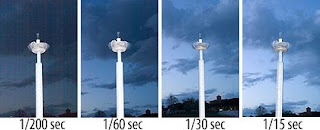
If you do not have a TTL-flash, there is another (older) way to do things. You probably know that your flash sync speed is about 1/200 to 1/250 sec. If you set a shorter shuttertime (say 1/500 sec), you’ll note a dark ban on the photograph, which is the shadow of your closing shutter curtain. But how about longer shutter speeds? They won’t affect your flash, nor the amount of flash light that falls on you picture. It does affect the amount of ambient light though. So if you want to have a brighter background (behind your flash-lit subject), expand your shutter time. For darker backgrounds, use a shorter shutter time. Depending on the strength and placement of your flash, you can even make a bright day look like twilight. Note that this trick works with TTL-flashes as well, but adjusting flash output is a lot simpler.
More resources:
A basic tutorial
Fill flash can be used in landscape photography too
Fill flash with a TTL flash
An extensive article on the TTL System (based on the Nikon version, but helpful to other brand owners as well.
Tuesday, April 22, 2008
Happy Earth Day!

Earth Day. To be honest, I never heard of it. I am kinda pro-earth, try to keep my ecological footprint within limited proportions. But I never heard of Earth Day untill a couple of days ago. I visited the Istock webpage to check my stats. They always have this easy link to seasonal pics and I more or less expected a link to Mother's Day pictures. But it said 'Earth Day'. So I got curious, looked for the pics and it was all about renewable energy, alternative fuels and so on. A couple of mine were there as well, as I also shoot this type of stuff.
Still curious, I did a search and found the wiki-page about Earth Day. Funny how photography can teach you new things in a way you never expected. Now you know as well. Happy Earth Day!
Picture of planet earth by NASA, available for free download
Sunday, April 20, 2008
Modelling tips: Comp card
 I am pretty confident I do not have to introduce the term portfolio to my readers. I am not too sure about the term comp card though. Some models have never heard of it and models that have heard of it, may still not have one.
A comp card (short for composite card, also called Z-card or zed-card) is an A5-sized card (5 by 8 inches) with a couple of your best pictures, some relevant statistics and contact details. You may compare it to a business card. Every business man has one, often with very impressive job titles (e.g. assistant executive floor manager, which means that the guy helps cleaning the floor). You don’t have an impressive job title, it’s just ‘model’. But then again, you have your looks. They are much more impressive than any job title, so why not put them on your business card?
So why have a comp card when you already have a portfolio? Well, there is a clear difference. When you go to a client or agency, you obviously take your pf with you, right? And when you go home, you take your pf back with you again, leaving the client with… ..nothing. Well, you are leaving a dazzling impression of course, but these tend to fade over time. Why not leave a couple of pictures, some statistics and your contact details? And why not put those o none single card? That is the sheer essence of the comp card. What if a client is seeing 10 models in one day? The client will have a hard time keeping all these beauties with their impressive portfolios apart. What would you think of the chances of the model that left a comp card on the client’s desk? It could be you.
So what should be on your comp card? The main picture should be a nice headshot. Your name should be on it, and your measurements. Your e-mail address of course and if you have a website, your url, should be listed. There is room for couple of other pics, to show your versatility. Check my article on portfolio selection for more tips.
I think we agree by now, you should have a comp card. But should you invest loads of money in it? Well, it depends. If you are aiming for a professional career and your portfolio has matured, you may want to invest in a large number of professionally printed comp cards. High quality cards will make you look professional. If your portfolio is still developing, your best shots now will not be your best shots in two months time. So you will want flexibility and it would not be wise to have a large number of cards. And with smaller numbers, high quality print work is very expensive. So do the next best thing: design a comp card in Photoshop yourself (see the link below) and have it printed as a photo. This way you’ll have a fairly good quality at a reasonable price without having to have huge numbers of prints. In either case, have a pdf-version as well, to send to clients by email. They are easy to make, easy to adjust and free to copy.
More resources:
A do it yourself-tutorial
Tips (note: commercial site)
And more tips
Saturday, April 19, 2008
Why Camabs?
The name of this blog is Camabs, a name that I use on most of my accounts on internet communities as well. Camabs is simply short for CamerA AbsurdA, which is the url (.nl) for my online portfolio. You may recognize a similarity to the term camera obscura, Latin for dark chamber. Note that this dark chamber does not refer to the room where film photographers do their post processing and printing, but to the optical device that was the ancestor to photography cameras. If you're interested in more details, read the wiki article here. I then adapted the name to reflect my slightly different approach to photography, hence CamerA AbsurdA.
Wednesday, April 16, 2008
Photography tips: blown out skies
 Don’t you hate it when that happens? You made a great pic and the subject of your pic is well exposed, but the sky is blown out white. It gives your picture a cheap and snapshottish feel. Why do the pros always have these great cloudy skies in their picture? More important, how do I get those as well?
Let’s first take a look at the cause of these blown out skies. They occur on overcast days, especially when a thin and even layer of clouds lays over the entire sky. The clouds work as a giant diffusion screen and you are shooting against the light whenever you have some sky in your composition. The sky will be too light compared to the rest of your image.
Composition
If you can, exclude skies from your composition or find that piece of sky where clouds are either thicker or absent. True, it’s the easiest tip to give and the hardest to execute. But try it anyway and be creative. Get closer to your subject, change your angle to have a tree or building behind it, or photograph from a high viewpoint to lower your angle.
Filters
Using filters on your camera might help, but don’t count on miracles to happen. If there is any blue in the clouds, orange or red filters may bring out the shape of the clouds. Obviously, this is useful only if you are shooting black and white. Neutral Density gradual (Nd grad) filters and polarizers may help a little. Filters –of any kind- will work bust when clouds are thin, i.e. when you can feel the sun through the clouds.
Use deep DOF and underexpose
A fairly simple thing to do is underexposure your picture. If you underexpose by about 1 stop (i.e. divide your exposure time by two), details in the clouds are more likely to become visible. Some blown out parts may remain, but at least it’s not all white. Combine the underexposure with a deep depth of field, so that the regained details are not lost in out-of-focus softness.
Better still: Bracket!
Obviously, with exposure correction, you will get the skies right, but have your subject underexposed. The best thing to do is take a couple of shots at different exposures and combine those in post processing. This does require some post processing skills though. HDR-software might come in handy too.
Fill flash
If your subject is close enough, use a flash to light your subject, allowing you to expose both the sky and your subject correctly. Depending on the type of flash and camera you’re using, you can either try to find the right amount of flash power or find the right combination of exposure time and aperture to get correct exposure of both the sky and the subject. I will devote an article to fill flash soon. ETA: done, you can find it here.
Post process
You might also want to adjust your picture after shooting it. Many people have suggested the ‘replace color’ option in Photoshop, or replacing the white with a picture of a sky. I am not too pleased with the results of these techniques. The results are okayish for small prints in the family or holiday album, but a photo enthusiast will probably want a better result. Below, you’ll find a link to a promising tutorial with a more natural looking result.
More resources
A nice PS tutorial
Wikipedia on bracketing
How to use fill flash
Wednesday, April 9, 2008
Photography tips: Fill the frame
The most useful tip I got during my very very early photography days was to move closer. That’s useful, too much background gives a pic a snapshottish feel, and we would like to avoid that.
 Now, let us take this tip a step further and move even closer. Move so close that the outer parts of your subject are no longer in the picture. Your subject is now filling the frame. Obviously, you can reach this result by cropping afterwards, but it’s much more fun to do it while composing your picture.
Filling the frame is the obvious thing to do when photographing a large number of small objects or a textured surface. It is also fairly common in photographing flowers, models, stills and architectural details. Why not try using it in a totally different context? Rules are only there to be broken.
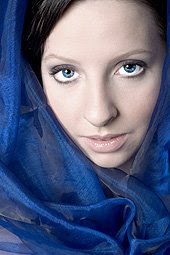
 In model photography, we have the advantage that the face has a natural frame. Normally (but again, it’s okay to break rules), we would not fill the entire frame with the fac, as we would loose too many facial features. We can however fill the frame with hair (and maybe some neck), to keep the shape of the face while loosing the background entirely.
More resources:
Examples from DPChallenge’s ‘Fill the Frame III’ contest
When to fill the frame and when not to
An alternative approach to filling the frame
Now, let us take this tip a step further and move even closer. Move so close that the outer parts of your subject are no longer in the picture. Your subject is now filling the frame. Obviously, you can reach this result by cropping afterwards, but it’s much more fun to do it while composing your picture.Filling the frame is the obvious thing to do when photographing a large number of small objects or a textured surface. It is also fairly common in photographing flowers, models, stills and architectural details. Why not try using it in a totally different context? Rules are only there to be broken.
In model photography, we have the advantage that the face has a natural frame. Normally (but again, it’s okay to break rules), we would not fill the entire frame with the fac, as we would loose too many facial features. We can however fill the frame with hair (and maybe some neck), to keep the shape of the face while loosing the background entirely.More resources:
Examples from DPChallenge’s ‘Fill the Frame III’ contest
When to fill the frame and when not to
An alternative approach to filling the frame
Modelling tips: food to make you look good
You are what you eat. Well, I am not advising to have models for breakfast of course, but you will have to be aware that whatever goes in your mouth affects the way you look. A couple of simple tips might help out here. The nice part is, they will also keep you healthier in the long run.
Water
Water is dangerous stuff. You can drown in it. But drinking it is okay. In fact, you should drink two litres of water every day. Water helps your body to hydrate your skin and to flush away unhealthy stuff that would otherwise be harder to get rid of. Water also helps you to stick to your diet if you are on one, as it fills your stomach.
Don’t starve yourself
There is nothing wrong with dieting per se. Let’s face it: modelling is about looks, and a good figure is part of that deal. There is a limit though: you should make sure that your body gets all the necessary ingredients. And yes, this does include some fat, as well as carbs and a fair number of calories. If you are on a diet, you are probably trying to look slim. If you follow a starvation-diet, you will look slimmer, yes. And you will also look unhealthy and unhappy. So don’t go there, it’s not worth it
 Do you have a sensitive skin?
Do you believe that eating pork or chocolate causes spots? You are wrong, or at least partially wrong. Air pollution and bacteria coming from your hands, your hair, etc. are among the causes, as are genetics and hormones. For some people, food can influence hormones enough to cause spots. So if you see spots, think of what you ate the days before. If you get spots every time after you ate pork (or anything else for that matter) your hormones might be sensitive to that specific food source. For most people however, skin problems are not about food, but about skin.
Quit smoking
There is no easier way to say this: smoking ruins your looks. It makes you look older and gives your skin a greyish cast. I know this is a useless tip. If you don’t smoke, you won’t need it. If you smoke, you don’t want to hear it. Addicted people are deaf to rational arguments.
And what about alcohol?
Wait a minute. You just told me to quit smoking, and now I can’t even have a drink? Relax, you can have your drink. Yes, alcohol is poison, but the human body is quite capable of coping with it, provided we don’t overuse. You should be beware of the dangers of alcohol though. First –and this may sound strange- alcohol makes you sleep bad. True, it helps you to go to sleep easily, but at the same time it degrades the quality of your sleep, and hence your looks. Second, alcohol will make you want to eat fat things. Nothing wrong with fat as such, but not the wrong types of fats in large quantities at a time of day when your body is not burning too many calories anymore. Third, heavy drinking will cause your blood pressure to rise, at least temporarily. The veins in your eyes will snap, causing red eyes, and you won’t feel too well. So don’t drink heavily the day before you go shooting. In general, just be careful. A couple of glasses is okay every now and then, excessive use is not.
More resources:
Extensive article on food and exercise for models
Beating eating disorders
Skin care
Water
Water is dangerous stuff. You can drown in it. But drinking it is okay. In fact, you should drink two litres of water every day. Water helps your body to hydrate your skin and to flush away unhealthy stuff that would otherwise be harder to get rid of. Water also helps you to stick to your diet if you are on one, as it fills your stomach.
Don’t starve yourself
There is nothing wrong with dieting per se. Let’s face it: modelling is about looks, and a good figure is part of that deal. There is a limit though: you should make sure that your body gets all the necessary ingredients. And yes, this does include some fat, as well as carbs and a fair number of calories. If you are on a diet, you are probably trying to look slim. If you follow a starvation-diet, you will look slimmer, yes. And you will also look unhealthy and unhappy. So don’t go there, it’s not worth it
Do you have a sensitive skin?Do you believe that eating pork or chocolate causes spots? You are wrong, or at least partially wrong. Air pollution and bacteria coming from your hands, your hair, etc. are among the causes, as are genetics and hormones. For some people, food can influence hormones enough to cause spots. So if you see spots, think of what you ate the days before. If you get spots every time after you ate pork (or anything else for that matter) your hormones might be sensitive to that specific food source. For most people however, skin problems are not about food, but about skin.
Quit smoking
There is no easier way to say this: smoking ruins your looks. It makes you look older and gives your skin a greyish cast. I know this is a useless tip. If you don’t smoke, you won’t need it. If you smoke, you don’t want to hear it. Addicted people are deaf to rational arguments.
And what about alcohol?
Wait a minute. You just told me to quit smoking, and now I can’t even have a drink? Relax, you can have your drink. Yes, alcohol is poison, but the human body is quite capable of coping with it, provided we don’t overuse. You should be beware of the dangers of alcohol though. First –and this may sound strange- alcohol makes you sleep bad. True, it helps you to go to sleep easily, but at the same time it degrades the quality of your sleep, and hence your looks. Second, alcohol will make you want to eat fat things. Nothing wrong with fat as such, but not the wrong types of fats in large quantities at a time of day when your body is not burning too many calories anymore. Third, heavy drinking will cause your blood pressure to rise, at least temporarily. The veins in your eyes will snap, causing red eyes, and you won’t feel too well. So don’t drink heavily the day before you go shooting. In general, just be careful. A couple of glasses is okay every now and then, excessive use is not.
More resources:
Extensive article on food and exercise for models
Beating eating disorders
Skin care
Friday, April 4, 2008
Modelling tips: specialize or diversify?
‘Every model wants to be a high fashion model.’ If that were true, there would be no need to write this article and if you are ‘every model’, you might as well stop reading it right now. If you are not, you may have asked yourself once or twice what type of modelling you like best and whether you should specialize or diversify.
Whether you are a (wannabe) pro or an amateur, I’ll assume your goal is to maximize your chances of getting hired. If you specialize, you might become very good at what you specialize in and build a focussed network. Obviously, when you specialize, you’ll need only one type of pictures in your portfolio, and you can put all your effort into creating your own style. If on the other hand, you diversify, there are loads of opportunities as well. For one, the sea you’ll be fishing from is so much larger and you will be able to find interesting niches. That obviously increases your chances. Doing photo shoots of all types also helps you learn faster, and become more versatile as a model.
 Since both options have their pros and cons, there is no clear-cut answer. Rather, it depends on two aspects. First, if you have a specific talent for any type of modelling, you’ll likely to be more successful specializing in that type. But how will you know? Don’t worry, the people you work with (photographers, make-up artists, styling artists, agents, other models) will tell you. If three photographers told you that you are great for fashion, you probably are. If they don’t, or if three photographers compliment you on three different styles, diversifying is probably a better option.
The second aspect is who you are. Are you the kind of person that likes to dig in deep and head for a single goal or do you feel better keeping all chances open? The first type will be happier specializing, whereas the second will benefit from a diversified approach.
More resources:
Types of modelling and the requirements that go with them
Another classification of types
Whether you are a (wannabe) pro or an amateur, I’ll assume your goal is to maximize your chances of getting hired. If you specialize, you might become very good at what you specialize in and build a focussed network. Obviously, when you specialize, you’ll need only one type of pictures in your portfolio, and you can put all your effort into creating your own style. If on the other hand, you diversify, there are loads of opportunities as well. For one, the sea you’ll be fishing from is so much larger and you will be able to find interesting niches. That obviously increases your chances. Doing photo shoots of all types also helps you learn faster, and become more versatile as a model.
Since both options have their pros and cons, there is no clear-cut answer. Rather, it depends on two aspects. First, if you have a specific talent for any type of modelling, you’ll likely to be more successful specializing in that type. But how will you know? Don’t worry, the people you work with (photographers, make-up artists, styling artists, agents, other models) will tell you. If three photographers told you that you are great for fashion, you probably are. If they don’t, or if three photographers compliment you on three different styles, diversifying is probably a better option.The second aspect is who you are. Are you the kind of person that likes to dig in deep and head for a single goal or do you feel better keeping all chances open? The first type will be happier specializing, whereas the second will benefit from a diversified approach.
More resources:
Types of modelling and the requirements that go with them
Another classification of types
Thursday, April 3, 2008
Hidden city: it should be here somewhere
 DPChallenge is a nice webcomunity built around themed photo contests. I participate in these challenges every now and then, and at one time I entered this picture for a challenge themed `The Hidden City´. There was a slight problem though. The city in this picture was so well hidden that many people did not recognize it and voted low. So the pic scored pretty low in the Challenge, but it did win an OOBIE, which is an unoffical award for an Out-Of-the-Box entry. After the challenge ended, a lot of people appologized for not recognizing the city and voting low. Click on the picture to see the picture in its original context at the DPChallenge website. To really appreciate (and relive) the story, read the comments from the bottom to the top.
Tuesday, April 1, 2008
Photography tips: reflectors for studio lights
You have probably heard terms like soft box, beauty dish, and standard head before. You may even own a couple of these and have some knowledge of how and when to use them. This article shows and discusses the main differences between studio lighting reflectors, thus helping you to understand even better when, how and why to use which reflector. I have used a single flash head aimed at an apple, using 6 different types of reflectors. The set-up was fixed, although the light intensity of the flash was varied to prevent over- or underexposure.
 Standard reflector: All the light is reflected and sent towards the apple in a fairly direct manner. We see a pronounced shadow, as well as a clear highlight. The light falls off slightly towards the edges of the corner and the picture has a slightly blueish cast, suggesting that this particular standard reflector is not exactly neutral.
 Snoot: The light is bundled towards the apple and leaves a very sharp shadow, strong contrast and a hard highlight. Light falls off at a short distance from the apple, causing natural vignetting. Snoots do loose a lot of light, this picture required an exposure of three stops more than that taken with the standard reflector.
 Soft box: basically a ‘box’ with internal reflection and diffusion, thus creating a larger surface of light. As you can see in the picture, both the shadow and the highlight are very soft and fall of is minimal. Because of the larger surface, the light more or less surrounds the apple, thus causing a double shadow: a small and (relatively) sharp one, and a larger, softer one.
 Beauty dish: Mainly used for lighting faces, allowing for soft light without loss of detail. The light is reflected against a small disc, onto a larger one, which in turn reflects the light towards your subject. This reflection causes some diffusion, while keeping the direction of the light. As you can see, both shadows and highlights are more pronounced than in the case of the soft box, but considerably softer than the light produced by the standard head. Like the soft box, the beauty dish has a larger surface, providing the double shadow.
 Reflecting umbrella: The flash head is turned away from the subject and flashes into an umbrella (white or silver, or gold). The umbrella bounces the light back on the subject. It gives a very even light, making it great for use as a fill flash. Compared to the though umbrella (next pic) it has a little more light fall off. Some types of umbrellas also permit light to pass, allowing it to reflect from the wall or ceiling as well. That’s what causes the warm effect in this pic.
 Through umbrella: Similar to the previous one (in fact I used the exact same umbrella). Now the head is turned towards the subject and flashes through the umbrella, making it act like a diffuser rather than a reflector. The effect is similar to a reflecting umbrella, but looses less light and light falls off slower.
More resources:
Some theory on soft and hard light in wikipedia
A related strobist-article
Easy to make DIY snoot
Forum discussion on BD vs SB
Standard reflector: All the light is reflected and sent towards the apple in a fairly direct manner. We see a pronounced shadow, as well as a clear highlight. The light falls off slightly towards the edges of the corner and the picture has a slightly blueish cast, suggesting that this particular standard reflector is not exactly neutral.Snoot: The light is bundled towards the apple and leaves a very sharp shadow, strong contrast and a hard highlight. Light falls off at a short distance from the apple, causing natural vignetting. Snoots do loose a lot of light, this picture required an exposure of three stops more than that taken with the standard reflector.Soft box: basically a ‘box’ with internal reflection and diffusion, thus creating a larger surface of light. As you can see in the picture, both the shadow and the highlight are very soft and fall of is minimal. Because of the larger surface, the light more or less surrounds the apple, thus causing a double shadow: a small and (relatively) sharp one, and a larger, softer one.Beauty dish: Mainly used for lighting faces, allowing for soft light without loss of detail. The light is reflected against a small disc, onto a larger one, which in turn reflects the light towards your subject. This reflection causes some diffusion, while keeping the direction of the light. As you can see, both shadows and highlights are more pronounced than in the case of the soft box, but considerably softer than the light produced by the standard head. Like the soft box, the beauty dish has a larger surface, providing the double shadow.Reflecting umbrella: The flash head is turned away from the subject and flashes into an umbrella (white or silver, or gold). The umbrella bounces the light back on the subject. It gives a very even light, making it great for use as a fill flash. Compared to the though umbrella (next pic) it has a little more light fall off. Some types of umbrellas also permit light to pass, allowing it to reflect from the wall or ceiling as well. That’s what causes the warm effect in this pic. Through umbrella: Similar to the previous one (in fact I used the exact same umbrella). Now the head is turned towards the subject and flashes through the umbrella, making it act like a diffuser rather than a reflector. The effect is similar to a reflecting umbrella, but looses less light and light falls off slower.More resources:
Some theory on soft and hard light in wikipedia
A related strobist-article
Easy to make DIY snoot
Forum discussion on BD vs SB
Subscribe to:
Posts (Atom)