Monday, December 29, 2008

Photography tips: puzzle macro

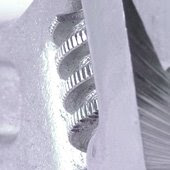
This is not so much a photography tip as it is an encouragement to have fun with your camera. Puzzle macros are very rewarding and you learn a lot from them at te same time. The concept is simple: take a picture so close that the viewer is unable to tell what the subject is. You don't need professional equipment to do it, just a macro function on your lens or camera and some creativity. And a subject ofcourse, but you'll find out that the world is full of subjects that you can use for this type of photography.

Think lines and curves
Puzzle macros are essentially abstract pictures. So forget about the function of your subject and look at it in terms of shapes. Try all kinds of angles and distances and watch your image change. Discover all the hidden lines and paterns. Change the direction of light if you can and watch your image change again. Experiment as much as you like, see how many different pictures you can get out of one single subject.
Learn while you have fun
Puzzle macros are fun to do, but you'll learn from them too. You look through your lens at a very different way than you normally would and you see the effect of small changes. This will help you develop your skills and experience, no matter what your level is.
more resources:

Saturday, December 27, 2008

What were Nintendo thinking?

I am the proud owner of a Nintendo Wii. In fact, I own a balance board as well. For those who don't know: the balance board is a board you stand on. It measures the force coming from both feet (i.e. your balance) and it enables you to do all kinds of games and sports (well, kind off).

One of the sports you can practice on a Wii balance board is skiing. I was really excited about this option, because I like skiing a lot. So I tried the slalom run. At a slow pace, all went well, but as soon as speeds wen up, I kept steering the wrong direction. Why? Because the guy that developed the program doesn't know anything about skiing. How do I know? Well, it's simple. If you are on a ski slope and you put all your weight on your right leg, what direction will you go? Left, anyone who has ever skied knows that. On the Wii Skii, you'll go right if you put your weight on your right leg. Exactly the other way around! At slow speeds, my mind can think around that, but at higher speeds, muscle memory takes over, and I start steering the right (wrong) way.

Okay, I know it's not as big a problem as climte change or world poverty, but what were Nintendo thinking? Does gravity work the other way around in Japan? Why on earth does a company invest millions in developing software without taking the tiny trouble to check whether the directions are correct? They even sell a separate disc containing ski-related games only. Who's going to buy that? Right, ski-fanatics. But they will get frustrated, since their muscle memory will send them the right (wrong) way.

Wednesday, December 24, 2008

Modeling tips: look sexy

Sex sells. No need to be shy about that. Advertisers use models that look sexy to sell their products. If a model wants work, she (and he too) will need to be able to look sexy. And it has to show from the model's portfolio as well.

Who needs nudity?
Don't go filling up your porfolio with naked pictures of yourself, that's not how it works. Nothing wrong whith nudity, but being naked and looking sexy is not the same thing. In fact, most of the good nudity photos are not even erotic, they are figurative. And you can look sexy with your clothes on, probably even sexier than you look naked. The suggestion of nudity can arouse more than actual nudity. Likewise, a seductive look can even make a close portrait look sexy.

Color code
There is ample annecdotical and scientific evidence that men associate the color red with sexy. So, red clothes and red lipstick will help you look sexy. Blushing cheeks help as well. Psychological tests have shown that even a red background adds to the sexieness of the person pictured. For male viewers that is, women tend to be less sensitive to this particular color association.

Feel sexy = look sexy
It sounds simple and it is. If you feel sexy, you will look sexy. I will make your looks more seductive and send natural blushes to your cheeks. So, forget about that photographer and anyone else in the studio and start thinking about the last time you felt particularly sexy. No matter what it is, as long as it works for you. DOn´t get carried away though.

Let mother nature help you
Did you know that mother nature has a simple trick to help people reproduce? Women look sexier in the days after thier ovulation. That's when they are fertile, so that's when moter nature wants them to breed. So mother nature makes subtle changes to your looks during that fertile stage. They are hard to notice by themselves, but they do make you look sexy. So if you can, plan a sexy shoot halfway your period. sorry, this one is useless for male models.

Wednesday, December 10, 2008

Calendar Girls

Meet calendar girls Luka and Olivia from the nearby city farm. They are girls (sisters, in fact) and they are on a calendar. The calendar is sold by a Brittish publisher called Avonside. This particular picture was on a 2008 calendar on pigs.
Of course it´s pretty cool if people use your pics to put it on a calendar that is actually sold. Some people had 'my' pigs on their walls for an entire month! But there was a catch here. Avonside bought the picture (and many others) from Shutterstock at the lowest available rate. These rates are very low, but they do not allow for reselling. Which is basically what you do when you put a picture on a calendar and sell the calendar. So Shutterstock send out their legal people to defend the rights of their submitters (and their own of course, microstock is no charity). Shutterstock and Avonside setteld the case and each photographer was paid properly for the use of their pictures.
That's what I like about microstock agencies, such as Shutterstock. Yes, they get a substantial percentage of sales, but they take care of all the hassle. They provide the marketing so their subscribers get a much larger audience than they would through their own website. And if something goes wrong, they provide the legal support. Thanks guys!

Sunday, December 7, 2008

Photography tips: exif data

The pics on my site contain so-called exif-data. In fact, they contain only a small part of the actual exif-data, but its the part most people seem to be interested in. Among photographers, the word exif means information on camera type, lense type, focal length, ISO, aperture and shuttertime. Why do the pics on my site contain these data? Well, because people want that information. Why do they want to know? I haven't got a clue.

Mmmm, that's not entirely true. I do have some sort of clue here, it just doesn't convince me. The point is, if you see something you like, you want to know how it's made. Well, some people do. We have two ways to find out. First: think, how you would make it. This approach will not give an exact reproduction, but you'll have fun doing it, learn a lot from it and develop a style of your own.

The second method is to copy the process. Hardly as much fun, no style of your own (but by mistake) and not too much learning either. But it will give a perfect reproduction? Of course not, silly. The exif information tells you only so much. The shuttertime and aperture reveal that I used a flash for this picture. But how many flashes? And at what lighting ratio? How were they placed? No way you can tell that from the exif data, but it's the lighting that brings out the texture, which in turn is essential for this pic. But even for daylight shots, the direction, intensity and hue of the avalaible light are not in the exif data.

Technical information only tells a small part of the story of the picture, and it's never the interesting part. Set-up, lighting, composition and timing are all far more important than shuttertime and aperture. Even postprocessing is more important. The only interesting thing about exif data is why on earth people think it's important enough to use the right mouse button.

Saturday, November 29, 2008

Who’s getting old?

Human age keeps puzzling me, you know. Told you before that kids take a full cat’s life to stand on their own feet. But adults are strange too. They do have an age, but it makes no sense. Some guy are –say- 20 and leave the impression of an old man. Others are going on 40 and are young and playful like a one-year-old. Cat, that is. It made me wonder, you know? And again, I chose the philosophical approach.

Have you ever noted how a baby only recognizes the 20 cm around it? One year later, it recognizes an entire room and at 4, a kid has some knowledge of the street it lives in. At 16, a kid uses its entire city or region to live in. Adults spread their activities more and more, some travel around the world as if distances don’t exist. And then, by the end of their lives, they start retreating. In their villages at first, then in their nursing homes. At last, they will stay in their room, and even hardly get out of bed.

It’s similar with friends. A baby has no friends, a toddler may have a couple, and a kid has a classroom full. In college and university, new friends are made easily and some working adults have so-called social networks. Then comes the parenting stage, again meeting new people, parents to other kids, and so on and so on. But then, let’s look at the elderly again. Their old friends die one by one, and they hardly ever make any new ones. The number reduces, call it countdown if you want to.

The pattern is clear. Both in space and in number of friends. People start with nothing. And they end up with next to nothing too. In between, people have lots of space and friends. Low at one end, low at the other end, high in the middle. Doesn’t that sound like some kind of parabola? And parabola’s have a top bit, right? At this point, the increase turns into a decrease. And that, rather than your age, defines whether you’re getting old or not.

Let me give you the bottom line: As long as the size of your world and your social network increase, you’re young. Once they start stabilizing, start to worry. You’re heading towards the downward sloping part. Your world gets smaller, the number of friends decreases: you are getting old, no matter what your age is.

It’s just a matter of logic.

Saturday, November 22, 2008

Modeling tips: Be confident

Confidence. If anything is important for models, confidence is. Without it, you won’t get far, no matter how pretty or talented you are. True, most people that are talented, become confident because of their talent. But this is not always true. For some, it’s easier than for others. Luckily, confidence can be trained, and this article may help you training it.

Kill that parrot
Did you know you have a parrot on your shoulder? The silly bird keeps telling you what other people think about you and he does so in a very negative voice. And you know what? The parrot is wrong 99% of the time. If your hair is a little bit out of shape for instance, the parrot will tell you that people think you look ridiculous. Wrong. Most people are far too busy with their own little problems to notice the minor things about your hair. Other people may notice it, but still think you look good, and yet other people might even like your new hairdo. Get rid of that parrot, stop worrying about what other people might think.

Fool yourself
Your mind does not know the difference between imagination and real things. You can use that. Act as-if you were confident. Ask yourself how you would walk if you were confident, ask yourself how you would talk if you were confident. Act like that and you will become confident. Keep telling yourself you can do it. Sounds silly, doesn’t it? But it works, try it, you’ll be surprised.

Stand tall and smile
You can do the same in body language. Stand with your feet slightly apart, take a deep breath and keep that position, straighten your back and neck. Now you look confident. And if you look confident, you’ll feel confident. People will treat you as if you were confident, thus building your confidence even further. Stop thinking this looks silly, it doesn’t. That’s just the parrot talking. Once you stand tall, put a smile on your face. Not a frozen one, just smile to people you pass by every now and then. Smiling people look better and get smiles in return, making you feel even better. And remember, smiles are free.

Face your fears
Are you nervous about something in particular? Ask yourself “What’s the worst that could happen?”. Just go out and do it. Overcoming fear is the ultimate boost for your confidence. Defeat your fears, and you’ll feel inconvincible.

Wednesday, November 19, 2008

Photography tips: self portraits

Self portraits are among the most difficult and most rewarding types of photography. It provides you with an extremely patient model, capable of understanding all your problems and prepared to try all kinds of lighting setups and crazy ideas. He or she may not be particularly pretty or very experienced in posing, but will make up for it with flexibility, perseverance and dedication. And all of that for free, your model won’t even ask for prints. It does however require some skills and a lot of practice to get decent results from self portraits.

The basics are the same as in the case of standard portraiture. Lighting, composition and expressions work out similar as in the case of photographing someone else. Likewise, self portraits require the same post processing steps as normal portraits, provided they are the same type of portraits.

Use a tripod
Here’s a pretty obvious tip: use a tripod. Yes, you can hold your camera at arm’s length and in some cases, this will yield a great self portrait. In most cases, it will only limit your possibilities. If you don’t have a tripod, put it on top of your wish list. It will open up a new world for you. In the meantime use something that’s sturdy and horizontal and has the required height.


Use a dummy
Once you’ve put your camera on the tripod, put a dummy in the place where you will be when shooting the portrait. Autofocus on the dummy, the set your camera or lens to manual focus and don’t move the camera. When ready, replace the dummy by yourself. Use a timer or a remote to trigger the shutter.

Make it a little easier on yourself
Getting decent self portraits is hard enough as it is, so why not make it a little easier on yourself. First of all, frame the picture a little wider than you normally would. This gives you room to crop the picture afterwards if you weren’t in the exact position you should be. Likewise, do not use very wide apertures. If you do, your depth of field becomes small, and your exact position will become a very critical factor. Using a smaller aperture (higher f) will literally give you some breathing space.

Monday, November 17, 2008

Minor update of CamerA AbsurdA

I recently did a major rehaul of my online portfolio CamerA AbsurdA, but didn´t add a `about`-section at that time. Now I did. The section also includes a couple of self portraits, including a brand new one, 'Loud Guy'. So, go check it out comments welcome.

Saturday, November 15, 2008

Modeling tips: care for your lips

Lips are important to models. Well-shaped and well-groomed lips can make a lasting impression and add to your sex-appeal. At the same time, lips are among the most exposed areas of your skin and very vulnerable at the same time. Your lips need good care, and it’s you who should provide it. The good thing is, it does not have to be expensive to be good.

Protect them
Lips need protection from the world around them, especially from heat, cold, sunburn and dry air. Petroleum jelly or Vaseline is a great and inexpensive protector and healer of dry skin in general and lips in particular. Use an old toothbrush to gently rub in the Vaseline a couple of times a day if you want to heal dried lips. You may want to mix the Vaseline with one or two tablespoons of a tasty (sweet or fresh) sauce, to enhance the flavor. For summer holidays or winter sports, use a lip balm with a high sun protection factor, as lips tend to burn badly in the sun.


Caress them
Want to give your lips a good time? Mash a quarter of a ripe papaya to a juicy paste. Lie down on a towel and apply a generous amount to the lips and the skin around the lips. Leave it on for 10 to 15 minutes. Next rinse the paste off and apply Vaseline or lip balm. The exfoliating enzymes in papaya help to soften and refine lip lines.

Make them work for you
When applying lipstick, use a brush. It provides a more even distribution and will reduce the amount of lipstick used. Before applying your lipstick, apply foundation on the lips or use a lip liner. This prevents the lipstick from 'bleeding'.

If you have big lips, colors like purple, brown and bronze will look good on you. If you want to make them look smaller, make use of deep colors. They make the lips recede. Shiny lipstick on the other hand will accentuate the size of your lips. If your lips are small, apply a bit of lip gloss or Vaseline on the middle part of the bottom lip, and use light colors. This make your lips look bigger.

More tips

Wednesday, November 12, 2008

On monogamy

Okay. I'm keeping an old promise here. And it's my pleasure. Monogamy and people is one of the most exciting philosophical issues I can think of. Sit down and make yourself comfortable, this is going to be a long article. You seated? Mmmmkay, let's go then.

Some animals are monogamous, and some are not. Some birdies live together till death (or a cat) do them part. Other species, such as cats, don’t give a rat’s ass and mate whenever they feel the need, with whoever is around. Needless to say, that’s the evolutionary successful strategy, as sexual diversity prevents inbreeding. But then again, swans and the like are still on this earth, so there must be something right about monogamy too.

But now for humans. Humans have a very ambiguous attitude towards monogamy. They do practice it, well most of them do, but they are hardly consistent. And I know why. Let’s first state the obvious: people cubs are awfully weak creatures. It takes them more than a year to even learn to walk. Well, more or less, wiggle would be a more appropriate description. What kind of evolutionary strategy is that? More than a year of immobility! I had a litter of eleven at my first birthday.

Hmmmm, well, that may not be a very good example, but you get my point, right? It takes humans a full cat’s life to even become an independent being. That’s where the human male comes in. I mean, raising a litter in, say, 8 weeks is easy. A female will have no trouble doing that on her own, right? But 18 years is a different cup-a-tea. A woman needs a day off every now and then. And protection for her helpless cubs. So, human females need the human male to stay around. And that requires monogamy, since human males can not stay around at two families at the same time.

Now that we have explained why humans are monogamous, let’s see why they deviate from their evolutionary successful behavior. Here’s why. The evolutionary successful behavior does not require the male (or the female) to be around all of the time. As long as a human does not have two full families, it’s okay. And then you guys invented birth control. With birth control, humans can lead the family life of a swan, and have the sex life of a cat at the same time. Or even that of a rabbit for that matter. And that’s where it all comes together. Humans are monogamous because they have to and inconsistent because they can.

It's just a matter of logic.

Thursday, November 6, 2008

Photography tips: skiing

Once the calendar turns to November, my heart starts beating faster. The skiing season is about to arrive. Most Europeans postpone their skiing trip to February or even March, when the sun is stronger and the days are longer. Nevertheless, the skiing season opens (if it ever closes) mid-November in high stations, such as Tux, Tignes and Val Thorens. That’s why November makes my heart beat faster, though this year I will have to wait ‘till mid-December to actually go there.

If you ever went on a skiing trip and took your camera, you might know how frustrating it can be. These majestic mountains, the steep slope you just managed to ski down from. They scream to be photographed, but once you get home, the magic’s gone. In fact, the magic is left behind in the mountains, not on the pictures. The mountains do not look so majestic, that slope does not look half as steep as it actually was and your superb skiing technique never shows on the pictures. Why? Because photographing snowy mountains is not as easy as it seems. These tips might help though.

White balance
First of all, get your white balance right. That’s the easiest tip, and you can actually do it in post processing if you shoot in RAW. If you don’t, the snow will look blueish, not white. Other things will look off too and you'll loose contrast.

Time of day
Like with any type of photography, choose the right time of day, which is either early morning or late afternoon. Don't try shooting at midday, the high sun will flatten all detail, especially since things are all white anyway.
Reference
This is a general tip for landscape photography. Try to have some points of reference in the picture, prefereably in the front and the back. This makes it easier for the viewer to relate. This picture (click it for a larger version on Flickr)shows some loose snow in the front and rocks in the back, as well as the boundary of the slope. The latter gives the viewer a clear indication of how steep the slope really is.
Timing
Skiing is a sport and in sport photography, timing is everything. And to time right at sports, you have to know the sport. Shooting exactly in the middle of turn is not going to give a great skiing picture, nor is shooting at a straight end. Breaking and finishing a turn are nice moments in term of spectacular snow clouds, whereas the body position is great at the start of a turn. Obviously, jumps are also great moments to shoot, not matter if they go right or wrong.
Get down!
Choose a low angle, both for skiers and for mountains. Low angles will make slopes look steeper, will make mountains look higher and will make jumps and other actions much more impressive. It will also allow you more often to get some sky in your picture, providing the much wanted contrast of the bright blue against the clear white, especially if you use a polarizer.

Tuesday, November 4, 2008

Modelling tips: plan your career (3)

Part 1 of this series was about making plans, part 2 about checking on them. Part 3 of planning your career is about deviating from your plans. This happens more often than not. In fact, plans sometimes seem to be made to be able to deviate from them. Why? Because plans involve the future, and the future is intrinsically unpredictable. Things can happen. Good things, bad things, things you never thought of. And if they happen, it may be wise to deviate from your plans.

Say you planned to start your career on the catwalk. Maybe later, you were thinking, you were going to switch to magazines. Then a magazine comes along, wanting to hire you for an editorial. Will you refuse because it doesn’t fit your plan? No you won’t. Assess the offer, and if it is any good, forget about the plan: deviate! If this happens once or twice, it’s okay to deviate, while in the meantime following the plan as, well, planned. If it occurs more often, you’ll have to think about changing the plan. You just might be more fit for magazines than for catwalks. Or maybe you are not, but coincidence has granted you a head start in magazines and you should grab the opportunity.

How will you know when to deviate from your plans and when to change them? You won’t. There is no such thing as a golden rule here. You can ask other models and photographers around you what they think, but remember that they will give you opinions rather than facts. On the other hand, if five or six experienced people share the same opinion, it might as well be a good one. If you’re with an agency, go ask them. They know a lot, and your interest is their interest. Unless of course, you are with a catwalk-specialized agency. After collecting the opinions, make a choice. It may not be the right choice, but you’ll have to make one. It’s no use waiting for the ‘right’ information to come by, because you’ll never have enough information. Besides, the ‘right’ information has the peculiarity of coming buy after you made your decision. It always does.

A couple of common-sense issues should be kept in mind though. If you’ve invested heavily in a catwalk career and it hasn’t paid off, ask yourself why. Is catwalk the right choice for you? Is it just too early for pay offs? Do you expect pay offs in the near future? Do they outweigh the benefits of switching to magazines? No easy answers here, I’m sorry. When in doubt, it’s okay to follow two tracks for say two, three months. If your catwalk pay efforts do not pay off in these months, or if magazines keep approaching you, you’ll know what to do. Don’t stay on two tracks for too long though, dividing your attention may distort your focus.

Friday, October 31, 2008

to have and not hold

"Sadder still to watch it die than never to have known it..." That's a line from a song I heard recently, and it instantly turned on my phylosophical instinct. Is this true? Does it hold for all people and all 'its'? Having given birth to eleven kittens at the age of 1, I can tell you I do not at all miss my fertillity. But I can't compare to never having had it, now can I?

If I were to ask it to an economist -like the Camabs guy-, he'dd rattle on about time preference of consumption. He would totally loose me and ten come to the conclusion that it's not true. If having something yields utility, having had it yields more utility than never ever having it. Sounds simple, that's how economists think. But now for actual people.

What if one has a talent and looses it? Say a painter gets arthritis and can no longer paint. Sad, yes, but the paintings remain. Would it be different for an artist that has no materialized work? Say a musician that never recorded her work. True, that's pretty sad allright. But what about the memories and all the people recieving joy from that music in the past?

And how about love? What if you have love and loose it? Would it be better than to never have known love at all? Damn sure it wouldn't! Yes, it hurts when it's over. For a while. Then it fades. But the memory remains (now isn't that some song too?) and the good things lasted a lot longer than the grief. For most loves that is, some peeps just can't do anything right.

Now hold on, lets get real serious. No, I mean it. A real tough one. What about loosing a kid versus never having had one. Which one is worse? No doubt about it, loosing someone dear is tough. Loosing your kid is about as tough as it gets. That's what I think, I am lucky enough not to know for sure. But it's damn hard to imagine anything tougher than that, y'all agree. So, is this the case were it is sadder to have had than never ever had? No, wait. What does it imply? It implies that the life of the deceased kid did not have any positive value whatsoever. That can not be true. If its life, however short it was, is less important then the loss of that same life, then it was worth nothing. That's simply not right, and inconsistent on top of it. Therefore, logic tells us that it is never sadder to have had than to never had at all.

A bit too heavy for you, this one? Go here to cheer up, and I'll promise a lighter blog next week.

Wednesday, October 29, 2008

Photography tips: still life photography, a primer

Still life photography is a genre by itself. Derived from the old masters and their paintings, photographers collect stuff to photograph it. The still life has no fixed rules of right and wrong and gives an incredible freedom in lighting and composition. Some things should however be kept in mind when trying to make a still life that stands out.

A theme
A still life should be more than just a collection of thingies. The vast majority of great still lifes has a theme. It could be anything: a profession, a season, any activity. a song title, a color, the list is endless. The main point is, that the items in the still life should be presented in a theme, and be consistent within the theme. Cornucopia still lifes for instance implement abundance, so they require a lot of items. ICT still lifes would become inconsistent if done against a very natural or classical background.

Table shots
Most good still lifes are table shots. That is, the camera is at the same height as the scene is, or just a little higher. This camera standpoint provides a natural looking perspective, altough in real life, we would not look at most of these things horizontally. I do know of a couple of successful exceptions to this rule, so it's no fixed rule. Like always, deviating from the rules provides an extra handycap, but it can work out great.

Composition, background and lighting
The freedom in composing a still life is endless. One can use any composition rule, combine a couple of them or ignore them all together. Combinations of the rule of thirds with other rules are often used, but again, feel free to break the rules as you go.

Background and lighting are free too, but they should not attract too much attention and be consistent with the theme. Neutral backgrounds are okay, but if the still life has a nautical theme, why not use a nautical map as a background? If it is too distracting, use a shallow depth of field to tune down it's presence. White backgrounds are fine too.

Still lifes often use light tents are a single light source that suggests natural light through a window (often using fill lights or reflectors as well). But if you feel backlight works better, why not give it a try? As long as all the relevant details are revealed properly and the lighting does not distract from the the, it's fine.

Thursday, October 23, 2008

What a Relief!

You may have noticed I've been kinda quiet recently. I hope you have. 'cos it means you've missed me. Thank you, I love you too. The thing is, I've been kinda busy. Well, worried sick is a better word I guess. I've been worrying so hard, I couldn't find the time for philosophy. Not a single original thought has crossed my mind last week.

Why, you say? Here's why. The little camabs cub is why. Funny little fella, pretty dominant type too. Told you 'bout him earlier, remember? He's got a running nose. Not just this week, but, like, forever. No wonder, human kids are weak. I'll tell you about that some day. So, the big camabs-guy took his son to the doctor. Sounds like a joke, right? It's not. It's the beginning of a nightmare. The doctor used the A-word: Allergy. Big deal you say? Not if you're a cat. Humans are overprotective of their kids, you know. If they are allergic, we have to go. And now the camabs cub was up for a blood test for kitty-allergy.

This morning, the camabs guy called the doctor. You know cats have fabulous ears, don't you? I could not believe mine. The kid is not allergic to cats! I get to stay at the camabs residence. Can't tell you how happy I am. Too excited to think right now, but once I get myself together, I'll devote my attention to philosophy again. See you then!


Friday, October 17, 2008

Photography tips: Print Size

A question I hear quite often is "I have a camera of such-and-so-much megapixels, how large can I print?" The question is in fact fairly easy to answer, but the problem is that many people tend to loose themself in the worship of figures that are only meant to suggest quality.

Resolution: Pixels per inch
The resolution of a picture is defined by the number of pixels per inch (ppi), often also referred to as dots per inch (dpi). The latter term is incorrect, but used so often that you can safely assume that ppi is meant. The industry standard for high quality printing (glossy magazines, art books) is 300 ppi. That is allready a high number, but still you can hear people in discussion forums state that 500 or 600 is better. That is plain bullshit. You will need a magnifying glass to spot the difference between 240 and 300 ppi, so it will take a microscope to recognize any difference beyond 300 ppi. For pictures that are closely inspected, 200 to 300 ppi is the range you should be looking for.


Viewing distance
But wait. Most people posing the question from the intro pose the question because they want to make a large print. Will the large print be up for close inspection? No, large prints are looked at from a larger distance. At arms length, 100 to 150 ppi is allready fine, and if the viewer is 5-6 feet away, 70 or 80 ppi might even be okay, provided the picture itself is sharp and you use decent paper and a good printer.


Start calculating
Once you know for what purpose you will be calculating and have choosen the correct ppi, the calculation is easy. Simply divide the length and width of you picture in pixels by the ppi number you've picked, and you find the size in inches. For centimeters, multiply by 2.5. Let's say you have a 3072 x 2048 (=6 MP) picture, and you have decided to print it at 100 dpi. You print size is then 3072/100=30.72 x 2048/100=20.48 inch or 75 by 50 cm.


More resources:

Monday, October 13, 2008

For Joeri

Today I heard that my former colleague and friend Joeri Gorter was killed in an accident last Friday. Joeri (Dutch spelling for Yuri) was on a bicycle trip through the US when he was hit by a truck. This is a sad loss. I have always known Joeri as an energetic and enthusiastic guy and that's how I will remember him.

Despite the fact that Joeri's death comes way too early, I find comfort in the way he died. If you have to die, why not die doing something you love to do? This knowledge does not fill the gap Joeri leaves behind; it just softens the pain for those who remember Joeri. He left life the way he lived it: energetic and enthusiastic.

Saturday, October 11, 2008

Modeling tips: plan your career (2)

Last week's article was about setting goals, defining steps and taking action. This week, I'll discuss the evaluation of your plans and actions. Normally, you wouldn't evaluate after a week of course, so read the article now and bookmark for later use.

When?

Many people seem to wonder when they should evaluate their goals. In fact, it is pretty obvious. Remember what the "T" in S.M.A.R.T. means? Right, timely. It means that the definition of your goals include a deadline. And when the deadline is there, the moment of evaluation has come as well. Of course, if your reach a goal before the deadline, don't hesitate to evaluate before that deadline. Since all your goals are measurable, it won't be hard to note if you've reached one.


What?

Evaluation. It sounds like something very complicated for high-educated people. It's not. In fact, you do it all the time in daily life. Did I like that meal? How do I look in that dress? How much money do I have left? Was that movie any good? Answering these questions means you're evaluating. Evaluation is nothing more than posing the right questions and answering them as good as you can. It's the same with goals: Did I reach them? Why(not)? Did I follow the steps? Did I take the actions I defined? Did I take other actions instead because an opportunity came by? And so on.


Note that there are no right and wrong answers. Also note that you are not on trial. There is only one person you are evaluating for, and that is you. So be honest and serious. No socially desirable answers, you'll be fooling yourself and yourself alone.


Then what?

So, okay, I've answered the questions, now what? First of all, be happy and proud of every goal you reached. Great work, well done. Now go find new, higher, goals to follow up on your success. Second, learn from the goals you didn't reach? Why didn't you? Were they set too high? Adjust them. Were the steps insufficient? Add more steps. Didn't you work hard enough? Work harder. Was it bad luck? Are you sure? Hope for more luck next time and think of how you can increase your luck.

In short: every time you reach a goal or deadline, evaluate, learn and adjust your planning. Plans are dynamic in nature, because they involve progression. Don't be afraid to adjust your plans, be worried if there is no need to.

Thursday, October 9, 2008

Photography tips: Vanishing point

One of the main challenges in photography is trying to capture three dimensions in a two-dimensional frame. A picture, either on paper, on canvas, or an screen, has no depth. It is up to the photographer to suggest depth. Last week’s article, on shallow depth of field, showed you one way to suggest depth. This week’s article is about a composition technique called vanishing point.

I don’t know about you, but the very first thing I learned when drawing perspective, is to place a point on the horizon. All the horizontal lines in the drawing should the lead to this point. This technique creates the suggestion of perspective and hence depth. Photography is not the same as drawing obviously, but photographers use many tricks that drawers thought of first. This is one of them. The difference is that the photographer does not have to place a point on the horizon. The point is already there, the photographer only has to recognize it. How? By following horizontal lines. All horizontal lines pointing into the photo seem to lead to one point. That point is the vanishing point.

Having multiple lines aiming at a single point gives a picture depth in the exact same way as it is done in drawings. Buildings are always glad to provide horizontal lines leading to a vanishing point. The picture of the Parthenon clearly shows how it works. Similar powerful lines toward the vanishing point may be found in rails and railroads. Note that the point itself does not have to be visible. It doesn’t even have to be in the picture. The mere suggestion of the point is sufficient to give depth to your picture.

More resources
DPChallenge Vanishing point Challenge (lots of examples)

Wednesday, October 8, 2008

Forbidden Love

"O Romeo, Romeo! wherefore art thou Romeo?". Human literature is full of forbidden love. And that's just literature. I am guessing that about three quarters of all romance novels is about this subject. Not to mentions songs. And if you guys love to read and hear about it, that's probably because you recognize your own life in it.

I tried to figure out why humans care so much about forbidden love. I can guess why you care about love, but if you care, why forbid it? And even if it's forbidden, why bother? People don't care 'bout speed limits, why care 'bout love prohibition?

Here's what I found: In the early days -The Romeo and Juliet days-, love was forbidden because of class differences. Had to do with inheriting power. Well, I guess you guys found out by now how silly a reason that is. But some taboos are still left: love between coworkers, love between neighbors, love between people who are married. Not to each other that is. I will discuss the monogamy issue in a future blog article, For now, let me tell you I have not found a valid reason why two consulting adults who fall in love with each other, should not be allowed to be together.

phew, need a little rest here. Philosophy is heavy stuff and these sentences with double negations are just exhausting.

Where was I going? Oh right, just wrapping up I guess. I wanted to note that falling in love is a natural thing. Since (Spinoza) nature is God and (any religion) God should be obeyed, people should stop resisting falling in love. Didn't I already tell you to listen to your heart?

It's just a matter of logic.

Friday, October 3, 2008

Modeling tips: plan your career (1)

Have you ever noticed that most models just hope for a brilliant career, but don't have a firm plan to realize their dreams? Some models do work hard and grab any chance that comes along, but models that actually set out to reach specified goals are rare. In many types of careers, planning is common, so why not in modeling? It is a serious profession, you know? And what's more, competition is tough in the modeling world. So why not make the difference? And it's not as hard as you might think

Set goals
The first thing to do is to tell yourself where you want to be in a year, in two years and so on. Be ambitious but realistic. If you aim too low, you won't reach high. If you aim too high, you might get frustrated. Make sure your goals are S.M.A.R.T. (Specific, Measurable, Attainable, Realistic and Timely, see the link below for more information) and write them down.

Define steps
Setting goals is step one, but how do you reach them? Think. For most goals you can find out for yourself what steps are needed to reach them. If you can't, find help. Ask your agent or ask a model that has already reached a similar goal. Define your steps as actions and set deadlines for them. Note that some steps have to be carried out in a particulair order. The order and the deadlines together create something that looks like a scheme. This is your path to success, now you'll just have to follow it.

Take action
This is the hardest part for some, and the easiest for others. At some point, you will gain nothing in further planning. It's time to act. Call that agent or photographer you planned to work with. Register that url for your own website. Select the pictures for your comp card. Once you finished a step or reached a goal, mark it on your list. It's very rewarding to see the number of marked items on your list grow.

Obviously, you should not stick to your planning too tight. If an opportunity comes by that's not on your list, forget the list. Grab that opportunity! Keep in mind that planning is a tool, not a goal in itself.

Next week: part 2...

more resources:
about S.M.A.R.T.

Thursday, October 2, 2008

Photography tip: Shallow depth of field

It is my experience that the use of shallow depth of field (dof) is one of the easiest ways to impress people with your photography skills. Obviously, we're not here to impress people with our photography skills, so it's good to note that shallow dof is also a great way to isolate your subject from busy backgrounds.
The picture to the left clearly shows this latter function. Despite the fact that the background is a pretty girl with fresh-colored clothing, there is no doubt where your eyes want to go. The orange draws the attention away from the face, which would be the natural focus point in such a picture. It is the narrow dof that creates this effect. The sharpness is carefully laid in only one place in the picture. That's the 'why', now for the 'how'.
Aperture
The obvious way to create shallow dof is using a wide aperture (i.e. a small f-number). The example picture was shot at f/1.8, which obviously requires a lens capable of such a wide aperture. Do not despair if you do not have such a lens however, the effect can be reached at f/4 or f/5 as well.
Focussing distance
Your depth of field is also narrowed if you approach your subject closer. If your lens or camera is not capable of wide apertures, just move in a little closer. In macro-photography, this is even considered a disadvantage, as the extreme close focussing distances do not leave room for sufficient depth of field in the picture. I allready explained that, remember?
Focal length
Finally, focal length also influences the depth of field. The longer (more tele) the focal length of your lens is, the narrower the depth of field will be. Of course, there is a rade off between focal length and focussing distance. You can calculate the your depth of field from the website given in the link below.
Don't overdo
Some people are so impressed with the wide aperture of their lens that they use it wide open all the time. Next thing you know they start complaining about lack of sharpness in user reviews. Let's face it, using a 50 mm lens at f/1.8 at 1 meter shooting distance, leaves you a depth of field of 3 cm. Nice for an orange, but hardly suited for anything bigger. Use a dof-calculator or your good judgement to choose the aperture that keeps the larger part of your subject in focus.
More resources:

Monday, September 29, 2008

CamerA AbsurdA refurbished


CamerA AbsurdA, my online portfolio, is now completely refurbished. I've changed the site from plain and simple to even plainer and simpler. No big stories, just the pics and the facts. It's an online portfolio, not a place for silly talks. I can use this blog for that if I want to. Although none of the pics are actually new, many of them are new to the site. You may have seen some of them on this blog or in some of the many other places where my pics hang out. Just take a look and enjoy!

Sunday, September 28, 2008

Photography tips: Join a community

This week's photography tip is very non-technical, yet useful for photographers of all levels: join a community. Communities help you develop your skills, as other members comment on your pics and tell you how they made theirs. These are great places to gather new ideas, learn new techniques and sharpen your skills by engaging in photo contests. And you can have fun while you're at it. For any community, the golden rule is that you recieve more when you give more. Just dumping your pics without ever commenting on the pics of others will not earn you respect. Communities can only thrive if members participate.

In the pre-internet era, the local photography club was the only option. Today, that option is still open, and many many are added. The world wide web is full of communities, many of which are dedicated to photography. In fact, the web is so full of these communities, that you'll have a hard time picking one. I'll mention a couple of the options, by no means suggesting that the others are not worth a try.

Contests (or challenges) are the backbone of this community. You can either become a registered user (free) or a member ($ 25/year, check out the differences here). Apart from challenges, DPChallenge has a forum with some very experienced and helpful members.
The site is famous for its extensive user reviews of photo gear, but it also has a nice forum with mostly very friendly and helpful members. The forum features a weekly and a monthly assignment with an oddly flexible deadline. Membership is free, but you can buy extra features as well as post processing software and gear.

Trekearth is all about travel photography. You can put your travel photo's online and hope for comments that either praise your photo or help you increase your skills. Sometimes, a member takes the trouble of re-processing your pic if he or she thinks it can be improved in post processing. Membership is free.

Flickr is a well known place to put your pictures online. Flickr is simply too large to be a community. Instead, it houses thousands of so-called groups. Some groups are very closed or hardly active, but others are thriving communities, often highly specialized in a specific type or aspect of photography. Some just collect pictures by theme, others have discussions and contests to go with the pics.

Local communities
The web may be world wide, but you can use it to join a local community as well. Why would you? Well, beacuse the members are near, that's why. In a local community, get-togethers are easy to organize, so you can go on field trips with other photographers and learn (and have fun)even more. Local members also know a lot about local things, such as dealers, photo locations, studios, models, make up artists and so on. And they are a nice place to trade second hand gear.

Wednesday, September 24, 2008

Heart or mind?

Hi. It's me again. The silly-named philosopher cat. Okay, I'll stop complaining about my name by now. In fact, the silly name helped me come up with a new philosophical issue. It made me think about the battle between heart and mind.

Before we go to the heart and mind matter, let me tell you the difference between wishing and wanting. I can wish about anything, but wanting it means I´m prepaired to acept the consequences. These could be anything, like going through effort, taking chances or loosing something else. The heart is in charge of the wishing department, but the mind keeps repating these bloody consequences. If mind and heart agree, wishing becomes wanting and you should go for it right away! But what if they don´t?

There are no compromises in the conflict between heart and mind. One of them has to win. You will have to choose whom to listen to. As long as you haven´t chosen, you´ll be torn apart. I can´t tell you which one to choose. I can give you a guide though.

The basic choice is the choice between regretting your actions and regretting not having acted. Your mind knows damn well what you'll loose if you do and your heart keeps telling you what you won't gain if you don't. No easy cost benefit analysis here, as both heart and mind exagerate the losses and fear is a bad advisor. Complicated? Well, that's why I'm a philosopher and you are not.

I'll simplify it for you: it is the choice between gaining what you wish (heart) and keeping what you have (mind). The latter is clear: You know what you got. You might not be entirely satisfied with it, but it works okay. That's safe and comforting. You don't know the thing you wish for though. Could be as great as your heart tells you, but you can´t be sure untill you tried. It's got RISK and EXCITEMENT written all over it. So if you´re the adventurous type, listen to your heart. If you´re just plain boring, listen to the mind.

It's just a matter of logic.

More resources:
by Roxette
by Saga
by Tröckener Kecks (in Dutch)

Sunday, September 21, 2008

Photography tips: The (non)sense of high fps numbers

The number of frames per second (fps) seems to be one of the main selling points Single Lens Reflex camera's (SLRs). I have to admit that I was happy with the increase from 2.5 to 5 fps when I switched from my old 300D to the 20D. Why? I'll try to explain below.

Increase your chances
The main reason to want to increase your fps is that it increases the chance of shooting the lucky shot. The more shots you can fire, the greater is the chance of an accidental hit. Does this sound silly? It might, and most of the time it is. Luck can never beat timing and insight. If you are shooting at 7 fps (which is considered fast), using a shuttertime of 1/100s, You are not capturing the moment for 93% percent of the time. Careful timing will always yield better results. But sometimes you'll need careful timing and luck. Consider shooting sports for instance. You can see the decisive moment coming, but shooting at the exact moment requires some luck. In those cases increasing your chances helps, although you'll have to realize that fps alone won't get you anywhere.

The sound factor
And then there's sound. Firing a range of shots from an SLR sounds pretty professional. It has no inluence on the quality of your pictures whatsoever, but to some it may increase their pleasure in photography. It's pretty similar to a biker enjoying the sound of a V-twin.

Friday, September 19, 2008

Alpha male (?)

The camabs guy confuses me, you know. At first sight, it's pretty clear, he's a typical alpha male. His body language spells pride and sovereignty like no other. His strong and decisive voice points in the same direction. So, like I said before, I knew right away when I entered the house.

But then I started to wonder. I never see him biting females. He allows other males in his territory without even the slightest groan or roar. What kind of an alpha male is that? He even allows other males to pet me. C'mon!

But then I realized, he has to be a real alpha male. How do I know? Simply, by looking at his youngest cub. The little fella knows no fear. He takes on kids twice his age. Did I say little? I meant young. No little about that kid. Typical son-of-an-alpha-male. Noisy and nosy and extremely cheeky too. And he gets away with it. Only alpha cubs can do that. And if the kid's an alpha cub, dad's got to be an alpha male.

It's just a matter of logic.

Thursday, September 18, 2008

modeling tips: Have you got what it takes?

Have you ever wondered whether you've got what it takes to become a good model? Sure, anyone can stand in front of a camera and have a picture taken. Technically, that makes you a model. But you know damn well that there's more to it than that. I am talking a modeling career here.

Many models never think about their abilities. They just dream. Getting famous, getting rich, having your picture in a magazine. Nothing wrong with dreaming, but wouldn't you like to know about the reality level of your dreams? Here's a simple test. Five statements. All you have to do is judging whether they are true or false.

1. I only work hard if absolutely necessary
2. The only thing a model needs is a pretty face and a nice body
3. Running a business is not my piece of cake
4. I do business with people because I like them
5. I can’t stand extreme circumstances (heat, cold, fear etc)

Did you state 'true' to either of these statements? Start worrying, you may have an unrealistic view of the world of modeling or you might not have the skills. Not all is lost though. Perceptions can be changed and skills can be learned. But be aware there is extra work involved.

If you entered 'false' at all statements, you're on the right track. No guarantees for a splendid career though, but at least you're up to it. Now all you need to do is put your mind to it, start working (hard, real hard) and pray for luck. Go get 'em!

Saturday, September 13, 2008

Modeling tips: hold on to your props

Some photographers like to use props. They might use them for a specific theme, to create a natural looking image or just because it increases posing possibilities. Props can really add something to a picture, if used properly. On the other hand, it’s pretty embarrassing to be pictured holding a guitar in a way you simply can not play it.

Today’s modeling tip is a very simple one: practice. If you’re planning a themed shoot, ask the photographer what props will be used and practice holding them. Use a mirror to check how you look. If you are not sure how to (hold a guitar, for instance), go look for images in magazines and on the web. Better still, ask someone who does know how to hold the specific prop.

For non-themed shoots, make sure that you know how to hold props in general. Below is a top ten (in no particular order) of items you might want to practice on. You might not have all of the items available at home, but that’s not the issue. You can practice your poses on anything of similar size. In fact, if your guitar-act is convincing on a broom, it will surely be convincing on a guitar

Stool or chair
cigarettes
flowers
food (fruit or candy)
a glass (wine, champagne, cocktail)
guitar
tools
studio equipment
sports equipment
weapons

Thursday, September 11, 2008

Photography tips: night photography

Night photography can be very rewarding, especially for romantic subjects and for nicely lit architecture. Famous landmarks may often get an extra dimension on night photos, as do fountains. This article discusses some issues that might be helpful in improving your night pictures.

The obvious thing about night photography is that it comes at low light levels. This can be overcome by higher ISO, larger apertures or longer shutter times. After dusk, you will probably have to rely on all three of them. The most common thing to do with longer shutter times is to use a tripod, but you do not always have to. I shot the picture to the left handheld, while leaning against a sturdy fence. Of course, using a fast (and lightweight) prime makes quite a difference. The links below the article provide some useful alternatives to tripods, that may be very useful when traveling.

I have one tip that may sound silly because it’s so simple. But I know I forgot a couple of times and at those times I can really curse myself for being such a dumbass. So do keep in mind to clean you lens surface. If it is only a bit greasy, all the lights in the picture will become nice glamorous star shapes. However great this effect may be when you are looking for it, it might not be what you want in a night picture.


The moon
And then we have the moon. Be careful with the moon. It depends on the weather and the availability of other light sources whether you want the moon in your picture. If it is only slightly hazy, the moon will become blurry. If the moon is the only noteworthy light source around, it will burn your highlights. In both cases, don’t shoot directly at the moon. In other cases, you can, provided that you manage to strike a balance between the light sources. You may also use the moon as a source of backlight for a well-lit building, or play around with the differences in color temperature between moonlight and artificial light.


Post processing
In post processing, do not adjust your white balance, or at least not too much. The warm colors of artificial light and the cool color of moonlight provide the typical night atmosphere you may be looking for. You might want to darken the blacks in post processing though. The darker parts in your picture may pick up some noise because of the high ISO and/or long shutter time. You can easily reduce this by squeezing the left (dark) end of your histogram a little, while keeping the middle constant. This increase contrast and darkens out most of the noise.


More resources:
String stabilizer (video tutorial)

Other alternatives for tripods

Sunday, September 7, 2008

The perfect way to loose weight

Look who's here again. The kitty with the silly name, remember? And have I got some news for you! I noted how people always try to loose weight. Torturing themselves in the gym, starving themselves with way too small diets, ordering expensive pills that promise weight loss without trouble. Yeah, right. Why the torture? Why the pain? Sure, even I can see people feel better not having to carry all that weight. But hey, there's an easy way, you know? And it's free too. Better still, it's fun.

Now I got your attention, right? Loosing weight, easy, free and fun, who wouldn't like that? Well, here's how. Fall in love. When people are in love, they loose their appetite, reducing the food-intake substantially without ever feeling hungry. At the same time, their hart starts racing like mad. That'll have to burn some fat, won't it? And people in love are also much more energetic, increasing the fat burn even further. On top of all that, being in love is just plain fun. Not to mention the extra excercise (and fun) you get if the loved one loves you back. Oops, being a naughty kitty there.

See, life's easy, as long as you think logically. No need to thank me though, all my pleasure.

Saturday, September 6, 2008

Modeling tips: Photographer types (7)

Photographers, you need them for the pictures. Most of them are nice people, but they also have some peculiarities. If you know how to cope with these peculiarities, you’ll get the optimal results from your photo shoots. To help you with this, this blog publishes a series of articles devoted to photographer types. Every single photographer is a unique person. Nevertheless, knowing the type could be useful for models. None of the observations in this article imply that a certain type of photographer delivers higher quality. Each category contains both good and bad photographers. The mere fact that a photographer is shy, arrogant or flamboyant tells us nothing about the quality of his or her work. It does tell us something about the way they work though.

Some models may think that there is no need to adjust to the photographer. ‘Let them adjust to me.’ If that’s you, let me ask you whether you care about the result of a photo shoot. If you don’t, stop reading (and you might as well stop modeling too). If you do, why not take all the factors into account that you can influence?


The intuitive type
The intuitive photographer is more or less the opposite of the technical type. He knows nothing about sweet points, composition rules or lighting ratios. He just takes pictures. And somehow, these pictures turn out just fine. The intuitive photographer's mind is a black box. Not only to outsiders, but to himself as well. He'll look through the viewfinder to get the picture he wants, adjusting the camera's settings as if he knew exactly what he's doing. In fact, he hasn't got a clue, but he does get the picture he's looking for.

I admit, these guys (I know a couple of lady photographers of this type too) drive me crazy with jealousy. I study and experiment my ass off to get a decent picture, while they just click away and perform at least as good, and often better.


Dos and don’ts
To make things worse (for my jealousy, that is) intuitive photographers are easy to handle for models. Since they don't have to think about what they are doing, the can devote all their attention to the model. Not to posing, they don't have to think about that either. They simply chat and interact as if a photoshoot is a piece of cake. For you, as a model, it makes life a lot easier, as long as you keep in mind that modeling does require some effort.

You have to keep in mind though that the intuitive photographer is not extremely flexible. If you want something specific, just ask. It might fit within his intuition and he'll perform effortlessly. If it lies outside his intuition, you might as well give up right away. There is no way he can reason how to get to the result you're looking for. Don't try to push him at this point, it will only lead to mutual frustration.

Other types

Thursday, September 4, 2008

Photography tips: macro photography and lighting

Everyone who has ever tried shooting macro shots knows that close-focussing distance comes with a huge loss of depth of field. Even at fairly small apertures like f/8 or f/11 it is hard to get an entire bug in focus. Yet if we look at 'professional' macro-shots, we see crisp and clear images. How on earth do they do that?

The answer is simple: use a flash and narrow your aperture even further. Macro lenses often go up to f/32, so that's not the problem. The problem is the direction of light. On-board flashes come from the wrong direction. Your lens gets in the way and casts a shadow over your subject. So, don't use an onboard flash, use a separate one.

Ring flashes
Flash manufacters make so-called ring flashes. They are to be mounted on your lens, and provide light from the exact same angle as your lens. This implies a total lack of shadow. It also implies that light is pretty flat, which may be desirable for some types of portraits, but not for macro photography. The very expensive types have the option of balancing (even aiming) left and right lights to solve this problem, but they come at a price. Apart from that, a ringflash might simply get in the way while trying to shoot bugs.

Off-camera flashes
The other option is to use an off-camera flash. You can either hand-hold it (very flexible), hand-hold it on a monopod (for more reach and stability), put it on an extension arm mounted to the camera (follows the camera wherever you point it) or put it on a tripod (stable, and you have both hands available for the camera). I use either of these options, depending on the situation. The main disadvantage of using an off-camera flash is the shadows it casts. This is not always a problem, but if it is, it may be softened by using a fill flash or a reflector. I have a nice small ring reflector that fits on my lense. It fills just like a ringflash would, and since it is not my main light source, I do not have the problem of flat lighting.


Tuesday, September 2, 2008

Cat-Philosopher

Hi, it's me again. The kitty with the silly name. Told you the Camabs guy is lazy, didn't I? Last week, he went abroad for a conference, using it as an excuse to write not one single blog-entry for an entire week. I am pretty sure they have internet in the UK. Pure laziness I tell you. So, allow me to kickstart the entire thing again, see if the Camabs guy is gonna pick it up.

Did you know I'm a great philosopher? It's quite convenient for a philosopher to be a cat. You get to sit and lay down all day, looking out the window. Gives you time to think you know? The main problem is, I keep falling asleep, and when I wake, I've forgotten al my brilliant thoughts. I franticly search my brean for the ideas, and once I refound them, I'm so tired, my eyes get heavy....

Need to get a grip at that issue, it's getting in the way of my philosophic development.

Here's one I remember. It answers one of the most important philosophical questions of all times and has not been solved yet. Untill now, that is. I have found out why people wear shoes. Shoes are in fact silly things. You're born without them and everyone can walk without them. Once you wear them, you'll loose direct contact with planet earth and you will not feel where you're walking. This implies you will have to devote other senses to the process of walking (e.g. look where you are walking), and that's just plain silly. The other senses have better things to do. Finding prey, duh. But people are different. They have allready halved their contact with planet Earth by walking on two feet, and now they´re reducing it even further. Why?


Here's why. Cats are why. We like to play at night, whereas humans want to sleep (silly guys, why don't they use daytime for that?). That's not a very good fit, now is it? We can still play of course, but I want the Camabs guy near me to increase the fun. That's where his shoes come in. They're great toys, and they have this great smell, giving a clear remembrance to the human that had them on. The smell can of course only be had if the human wears these shoes all day. So that's why. Problem solved. Next!