Saturday, January 24, 2009
Photography tips: Bad weather
Monday, January 12, 2009
Photography tips: repetitions
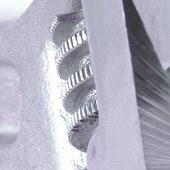
Repetitions are everywhere, you only have to recognize them. Looking for them and photographing them is a great practice and helps you train your mind and eye. Like with the previous tip, you don't need any specific gear. Any camera will do.
Walk and watch
The best vehicle for this type of photography is by foot. Just walk around and look around. Chances are you´ll see a reptition in no time. If you see one, shoot it. But wait. Don´t move on yet. Walk around the object, or move it about if it´s small enough. Try different viewpoints, get closer, get further away. Don´t just zoom if you have a zoom lens. This is not about focal length. Moving closer or further away changes your point of view. A flight of stairs looks entirely different from 10 meters away than from right beneath it. Explore this differences. The object will probably retain its repetitions, but their nature will change, and so will your picture. Have fun!
Monday, December 29, 2008
Photography tips: puzzle macro
This is not so much a photography tip as it is an encouragement to have fun with your camera. Puzzle macros are very rewarding and you learn a lot from them at te same time. The concept is simple: take a picture so close that the viewer is unable to tell what the subject is. You don't need professional equipment to do it, just a macro function on your lens or camera and some creativity. And a subject ofcourse, but you'll find out that the world is full of subjects that you can use for this type of photography.Sunday, December 7, 2008
Photography tips: exif data
Mmmm, that's not entirely true. I do have some sort of clue here, it just doesn't convince me. The point is, if you see something you like, you want to know how it's made. Well, some people do. We have two ways to find out. First: think, how you would make it. This approach will not give an exact reproduction, but you'll have fun doing it, learn a lot from it and develop a style of your own.
The second method is to copy the process. Hardly as much fun, no style of your own (but by mistake) and not too much learning either. But it will give a perfect reproduction? Of course not, silly. The exif information tells you only so much. The shuttertime and aperture reveal that I used a flash for this picture. But how many flashes? And at what lighting ratio? How were they placed? No way you can tell that from the exif data, but it's the lighting that brings out the texture, which in turn is essential for this pic. But even for daylight shots, the direction, intensity and hue of the avalaible light are not in the exif data.
Technical information only tells a small part of the story of the picture, and it's never the interesting part. Set-up, lighting, composition and timing are all far more important than shuttertime and aperture. Even postprocessing is more important. The only interesting thing about exif data is why on earth people think it's important enough to use the right mouse button.
Wednesday, November 19, 2008
Photography tips: self portraits
Self portraits are among the most difficult and most rewarding types of photography. It provides you with an extremely patient model, capable of understanding all your problems and prepared to try all kinds of lighting setups and crazy ideas. He or she may not be particularly pretty or very experienced in posing, but will make up for it with flexibility, perseverance and dedication. And all of that for free, your model won’t even ask for prints. It does however require some skills and a lot of practice to get decent results from self portraits. The basics are the same as in the case of standard portraiture. Lighting, composition and expressions work out similar as in the case of photographing someone else. Likewise, self portraits require the same post processing steps as normal portraits, provided they are the same type of portraits.
Use a tripod
Here’s a pretty obvious tip: use a tripod. Yes, you can hold your camera at arm’s length and in some cases, this will yield a great self portrait. In most cases, it will only limit your possibilities. If you don’t have a tripod, put it on top of your wish list. It will open up a new world for you. In the meantime use something that’s sturdy and horizontal and has the required height.
Use a dummy
Once you’ve put your camera on the tripod, put a dummy in the place where you will be when shooting the portrait. Autofocus on the dummy, the set your camera or lens to manual focus and don’t move the camera. When ready, replace the dummy by yourself. Use a timer or a remote to trigger the shutter.
Make it a little easier on yourself
Getting decent self portraits is hard enough as it is, so why not make it a little easier on yourself. First of all, frame the picture a little wider than you normally would. This gives you room to crop the picture afterwards if you weren’t in the exact position you should be. Likewise, do not use very wide apertures. If you do, your depth of field becomes small, and your exact position will become a very critical factor. Using a smaller aperture (higher f) will literally give you some breathing space.
Thursday, November 6, 2008
Photography tips: skiing
If you ever went on a skiing trip and took your camera, you might know how frustrating it can be. These majestic mountains, the steep slope you just managed to ski down from. They scream to be photographed, but once you get home, the magic’s gone. In fact, the magic is left behind in the mountains, not on the pictures. The mountains do not look so majestic, that slope does not look half as steep as it actually was and your superb skiing technique never shows on the pictures. Why? Because photographing snowy mountains is not as easy as it seems. These tips might help though.
White balance
First of all, get your white balance right. That’s the easiest tip, and you can actually do it in post processing if you shoot in RAW. If you don’t, the snow will look blueish, not white. Other things will look off too and you'll loose contrast.
Time of day
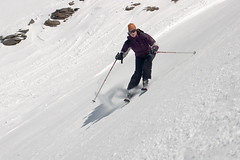
ReferenceThis is a general tip for landscape photography. Try to have some points of reference in the picture, prefereably in the front and the back. This makes it easier for the viewer to relate. This picture (click it for a larger version on Flickr)shows some loose snow in the front and rocks in the back, as well as the boundary of the slope. The latter gives the viewer a clear indication of how steep the slope really is.
Choose a low angle, both for skiers and for mountains. Low angles will make slopes look steeper, will make mountains look higher and will make jumps and other actions much more impressive. It will also allow you more often to get some sky in your picture, providing the much wanted contrast of the bright blue against the clear white, especially if you use a polarizer.
Wednesday, October 29, 2008
Photography tips: still life photography, a primer
A theme
A still life should be more than just a collection of thingies. The vast majority of great still lifes has a theme. It could be anything: a profession, a season, any activity. a song title, a color, the list is endless. The main point is, that the items in the still life should be presented in a theme, and be consistent within the theme. Cornucopia still lifes for instance implement abundance, so they require a lot of items. ICT still lifes would become inconsistent if done against a very natural or classical background.
Table shotsMost good still lifes are table shots. That is, the camera is at the same height as the scene is, or just a little higher. This camera standpoint provides a natural looking perspective, altough in real life, we would not look at most of these things horizontally. I do know of a couple of successful exceptions to this rule, so it's no fixed rule. Like always, deviating from the rules provides an extra handycap, but it can work out great.
Composition, background and lighting
The freedom in composing a still life is endless. One can use any composition rule, combine a couple of them or ignore them all together. Combinations of the rule of thirds with other rules are often used, but again, feel free to break the rules as you go.
Background and lighting are free too, but they should not attract too much attention and be consistent with the theme. Neutral backgrounds are okay, but if the still life has a nautical theme, why not use a nautical map as a background? If it is too distracting, use a shallow depth of field to tune down it's presence. White backgrounds are fine too.
Still lifes often use light tents are a single light source that suggests natural light through a window (often using fill lights or reflectors as well). But if you feel backlight works better, why not give it a try? As long as all the relevant details are revealed properly and the lighting does not distract from the the, it's fine.
Friday, October 17, 2008
Photography tips: Print Size
A question I hear quite often is "I have a camera of such-and-so-much megapixels, how large can I print?" The question is in fact fairly easy to answer, but the problem is that many people tend to loose themself in the worship of figures that are only meant to suggest quality.Thursday, October 9, 2008
Photography tips: Vanishing point
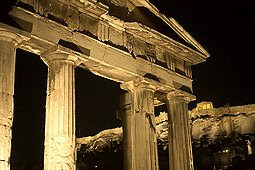
One of the main challenges in photography is trying to capture three dimensions in a two-dimensional frame. A picture, either on paper, on canvas, or an screen, has no depth. It is up to the photographer to suggest depth. Last week’s article, on shallow depth of field, showed you one way to suggest depth. This week’s article is about a composition technique called vanishing point.I don’t know about you, but the very first thing I learned when drawing perspective, is to place a point on the horizon. All the horizontal lines in the drawing should the lead to this point. This technique creates the suggestion of perspective and hence depth. Photography is not the same as drawing obviously, but photographers use many tricks that drawers thought of first. This is one of them. The difference is that the photographer does not have to place a point on the horizon. The point is already there, the photographer only has to recognize it. How? By following horizontal lines. All horizontal lines pointing into the photo seem to lead to one point. That point is the vanishing point.
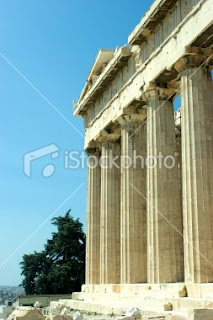
Having multiple lines aiming at a single point gives a picture depth in the exact same way as it is done in drawings. Buildings are always glad to provide horizontal lines leading to a vanishing point. The picture of the Parthenon clearly shows how it works. Similar powerful lines toward the vanishing point may be found in rails and railroads. Note that the point itself does not have to be visible. It doesn’t even have to be in the picture. The mere suggestion of the point is sufficient to give depth to your picture.
More resources
DPChallenge Vanishing point Challenge (lots of examples)
Thursday, October 2, 2008
Photography tip: Shallow depth of field
Sunday, September 28, 2008
Photography tips: Join a community
This week's photography tip is very non-technical, yet useful for photographers of all levels: join a community. Communities help you develop your skills, as other members comment on your pics and tell you how they made theirs. These are great places to gather new ideas, learn new techniques and sharpen your skills by engaging in photo contests. And you can have fun while you're at it. For any community, the golden rule is that you recieve more when you give more. Just dumping your pics without ever commenting on the pics of others will not earn you respect. Communities can only thrive if members participate. Thursday, September 11, 2008
Photography tips: night photography
The obvious thing about night photography is that it comes at low light levels. This can be overcome by higher ISO, larger apertures or longer shutter times. After dusk, you will probably have to rely on all three of them. The most common thing to do with longer shutter times is to use a tripod, but you do not always have to. I shot the picture to the left handheld, while leaning against a sturdy fence. Of course, using a fast (and lightweight) prime makes quite a difference. The links below the article provide some useful alternatives to tripods, that may be very useful when traveling.I have one tip that may sound silly because it’s so simple. But I know I forgot a couple of times and at those times I can really curse myself for being such a dumbass. So do keep in mind to clean you lens surface. If it is only a bit greasy, all the lights in the picture will become nice glamorous star shapes. However great this effect may be when you are looking for it, it might not be what you want in a night picture.
The moonAnd then we have the moon. Be careful with the moon. It depends on the weather and the availability of other light sources whether you want the moon in your picture. If it is only slightly hazy, the moon will become blurry. If the moon is the only noteworthy light source around, it will burn your highlights. In both cases, don’t shoot directly at the moon. In other cases, you can, provided that you manage to strike a balance between the light sources. You may also use the moon as a source of backlight for a well-lit building, or play around with the differences in color temperature between moonlight and artificial light.
Post processing
In post processing, do not adjust your white balance, or at least not too much. The warm colors of artificial light and the cool color of moonlight provide the typical night atmosphere you may be looking for. You might want to darken the blacks in post processing though. The darker parts in your picture may pick up some noise because of the high ISO and/or long shutter time. You can easily reduce this by squeezing the left (dark) end of your histogram a little, while keeping the middle constant. This increase contrast and darkens out most of the noise.
More resources:
String stabilizer (video tutorial)
Other alternatives for tripods
Thursday, September 4, 2008
Photography tips: macro photography and lighting
The answer is simple: use a flash and narrow your aperture even further. Macro lenses often go up to f/32, so that's not the problem. The problem is the direction of light. On-board flashes come from the wrong direction. Your lens gets in the way and casts a shadow over your subject. So, don't use an onboard flash, use a separate one.Ring flashes
Flash manufacters make so-called ring flashes. They are to be mounted on your lens, and provide light from the exact same angle as your lens. This implies a total lack of shadow. It also implies that light is pretty flat, which may be desirable for some types of portraits, but not for macro photography. The very expensive types have the option of balancing (even aiming) left and right lights to solve this problem, but they come at a price. Apart from that, a ringflash might simply get in the way while trying to shoot bugs.
Off-camera flashes
The other option is to use an off-camera flash. You can either hand-hold it (very flexible), hand-hold it on a monopod (for more reach and stability), put it on an extension arm mounted to the camera (follows the camera wherever you point it) or put it on a tripod (stable, and you have both hands available for the camera). I use either of these options, depending on the situation. The main disadvantage of using an off-camera flash is the shadows it casts. This is not always a problem, but if it is, it may be softened by using a fill flash or a reflector. I have a nice small ring reflector that fits on my lense. It fills just like a ringflash would, and since it is not my main light source, I do not have the problem of flat lighting.
Friday, August 22, 2008
Photography tips: the sweet spot
Monday, August 11, 2008
Photography tips: Fire!
Fire depicts warmth, coziness, maybe even a romantic evening in front of the fireplace. It may also depict danger and destruction, as fire has destructive powers. Plenty of reasons to want to photograph fire. But how?
Fire is a light source
Apart from warmth, fire provides light. It is important to note that the light that fire provides is weak and has a pretty high color temperature. Lighting a room with just fire provides a dimly lit room in an orange flow. The amount of light a normal fire provides is so weak that you can even look or photograph right into it. This obviously depends on the type of fire, since the sun is in fact nothing less than fire, and you would not want to look directly into it, even if it is thousands of miles away. But we are talking burning wood here.
Cozy or blazing?
Like I said, fire has two faces, the warm and kind one and the destructive one. If you look closely at both types of fire, you’ll note that the cozy fire burns much slower. You can use this knowledge to make a blazing fire pic out of a cozy fire. Using a fairly long exposure (try 1/3 sec for starters, and use a tripod) will create motion blur out of the slow movement of the flames, thus suggesting that the flames burn much faster.
Shorter exposures (say 1/100 sec) will freeze the motion, thus suggesting a cozy fire. However, fire provides insufficient light to make a decent picture at such a shutter speed. This implies that you will either have to raise our ISO or use a flash. In the latter case, make sure to bounce your flash and set your shutter time to balance flashlight and the light from the fire. See my earlier articles on bouncing and flashing by daylight for more details. Too much flash will result in a dull picture without the warm fire glow, so make sure to balance your light sources.
More resources:
Photoshop fire tutorials
Thursday, July 31, 2008
Photography tips: 5 tips for better holiday pics
I am sorry I insulted you by calling your pictures crappy (last weeks’ article). That wasn’t very nice of me. Let me make it up to you by giving you five tips to improve your holiday pictures. You may already know one or two of them, but that still leaves the other ones to improve your shooting.
Un-center your composition
Whatever it is, you are photographing, try not to put it in the middle of the picture. It yields boring pictures. Instead, use the rule of thirds: put your main object @1/3 or 2/3 of the width or height of your picture. This gives a natural feel to your pictures. Act likewise with landscapes: the horizon should be at 1/3 (for spectacular skies) or 2/3 (if there is a lot to see in the landscape) of your picture, not exactly halfway.
Shallow dof for famous shapes
So, you’re visiting the Eiffel Tower / Acropolis / Coliseum / Golden Gate Bridge / whatever famous landmark you can think of. We’ve seen zillions of pictures of these landmarks, how will yours be better? Well, since you are going to photograph your fellow travelers in front of the landmark anyway (that’s what tourists do, they seem to need some proof that they were actually there), photograph them using a shallow depth of field (dof). How? Make sure you are fairly close to John / Mary / whoever you are photographing and set a large aperture (low f-number, or use the camera's portraiture mode). Then focus on John / Mary / whoever and shoot. The landmark will now be slightly vague in the background, but still recognizable because of its famous features.
Use a polarizer
If you are going anywhere sunny and want to capture those clear blue skies, invest in a polarizer. See the earlier article on how to use it and what to expect.
Avoid crowds This one is a real challenge. Since you’re a tourist at a tourist attraction, you are part of the problem. If you’re at a top attraction during the top season, there will always be crowds. But you can limit the effect. Check for camera positions where crowds are less visible. Wait for big crowds to pass. If you just have a little patience, you’ll note that crowds tend to come in waves. Shoot between these waves. Zooming in on the subject may also help, and shooting at a slightly higher angle (especially for buildings) can be useful too. Don’t forget to picture the crowds as well, to show the folks at home just how packed the place was.
Time your visit
You may also avoid crowds by timing your visit at not-so-popular times, e.g. in the early morning or around dinner time (check the opening hours though). Timing will also help you get better light. Generally, and especially in sunny conditions, the light is much softer in the early morning or late afternoon. The hour before sunset provides the best light, and is therefore also known as ‘the golden hour’.
I sincerely hope you are not mad anymore and I wish you a great holiday.
Kind regards,
CamAbs
Tuesday, July 22, 2008
Photography tips: See your hometown through the eyes of a tourist
Ever wondered why most tourists take crappy pictures? There’s loads of reasons, like lack of experience, lack of photographic talent and so on. One reason in particular I would like to address here, and that is timing.Sure, some tourists are lucky enough to catch a day with a nice sky, and some are even wise enough to visit hotspots on not-so-hot times of day. But most of them get there on a guided tour, and bring their own obstacles (i.e. their fellow travelers) with them.
You won’t do that, you’re a local, right? You will probably not even visit the hotspots. At least I didn’t. I visited all the hotspots in the cities I once lived in after or before I lived in that city. Not while I lived there. I even passed some of these hotspots dozens of times without even noticing them.
Silly isn’t it? People coming from over the planet to gaze at the beauty of your city, while you don’t even notice. Even sillier when you realize you take better pictures than they do. You probably feel where I’m going by now? Right, go out there, and be a tourist in your hometown. Shoot the pictures they would liked to have shot but couldn’t because of the light or the crowds. You can go there anytime, right? You can wait for months to get that landmark against the background of a spectacular sunset or with the moon behind it on a cloudless night. You can take your pictures when no one else is around. And you are a better photographer, remember? So you are the one to make (and sell?) the top shot of that hotspot.
Friday, July 18, 2008
Photography tips: shooting in RAW
RAW means just that, raw. It is not an abbreviation; it refers to the uncooked nature of the data. For those interested in all the technical stuff that can be said about RAW-files, please refer to the wiki link provided below. I am not into technicalities, I care only for practical use.
Oh no! What have I done?
Recognize that? Post processing a large number of pics, getting into routine mode and finding out a little too late that that single precious picture should have been processed a tad different? No problem if your workflow is right, but what if you do this while taking the picture? Still had your white balance set to ‘cloudy’? Was your exposure correction still set to –1? No problem if you shoot in RAW. The great thing about using RAW is that it stores all the data that the sensor picks up. It does have its limits –a burnt highlight is a burnt highlight, detail that is not there, can not be stored- but its limits are much wider than that of a jpeg-file, leaving you far more room to compensate for your own stupidity during shooting.
Once you use RAW, you’ll start counting on it. I never bother to check the white balance on my camera, as it can simply be restored. I mostly use a grey card while shooting, but I have to say that Photoshop often does a great job at automatic conversions from RAW. True, white balance can be altered in any file type, but it works better with RAW-files, since all the data are there. This way, the quality loss is smaller (or even zero) than in the case of, say, a jpeg file.
If a pic is underexposed, you can save it in post processing at the cost of substantial noise. The same thing can be done in RAW, but at lower noise levels and with greater recovered detail in the dark areas. No wonder RAW files are far more suited for High Dynamic Range (HDR) applications. Most modern HDR-software even allows for HDR files from one single RAW-file. Try that with a jpeg-file!
The bottom line is that RAW files can help you save some of your result if you made a mistake or if the situation did not allow you to take a perfect picture. If your camera allows you to shoot RAW-files, start doing it now. If your camera doesn’t, take that ability into account when deciding on your next camera.
More resources
Wiki on RAW
Raw-workflow-links
Correcting your white balance using a grey card
Tutorial for a HDR-picture from 1 RAW-file
Friday, July 11, 2008
Photography tips: Don't wait for full frame
Digital SLRs come in two types, full frames and crop cameras. The distinction between the two is that the full frame has a sensor the same size as 35mm film, whereas crop cameras have a smaller (cropped) sensor, also labeled APS-C. Since picture quality (at least the part that the camera can influence) is positively related to sensor size, full frame sensors deliver better pics. Moreover, manufacturers tend to put full frame sensors in better cameras, hence full frame cameras are likely to produce better results. No wonder full frame cameras are major wannahavesSome lenses out on the market are designed specifically for APS-C cameras. They won’t fit on full frames and if they fit, they’ll cause heavy vignetting. Someone who owns a full frame camera will not buy such a lens. That makes sense. People who plan to buy a full frame camera in the future don’t buy these lenses either, which makes a whole lot less sense.
Let’s face it, most people who plan on going full frame one day, in fact only dream of going full frame one day. Even if they do buy one, ‘one day’ might be months or even years from now. All this time, they’re missing out on the good lens. Some people even buy the wrong focal length, since they are going to switch ‘one day’. Why not just have all the fun you can have with the right lens on your APS-C and resell it once you switch to full frame? The second hand market for lenses is pretty good.
And then there is technical progress. Every new generation camera is better than the previous one. If the APS-C camera is a couple of generations newer than a full frame one (as is the case with Canon’s 40D versus 5D), it might be as good and in some respects even better. Of course, you can wait for the next generation full frame. And put up with the wrong lens even longer.
More resources
Advantages of ful frame
A comparison between full frame and APS-C
Tuesday, June 24, 2008
Photography tips: Get down!
Okay, I’ve got to get this of my chest. This morning, I visited the nearby city farm with my two year old son. There was this little boy petting a rabbit. And then there was this boy’s granddad taking pictures. His camera was a small sized Canon dSLR, probably a recent Rebel-version. It had a zoom lens with a red stripe, I think it was the 24-70L. (not that It matters though) Granddad was obviously very proud of his grandson and he was taking dozens of pictures of the little boy having fun at the farm. And although granddad was apparently not very old or crippled, he did not bend his knees once.“What’s, the problem?”, you might ask. Well, the problem is that this guy spends an awful lot of money on gear and still fails to get a decent pic of his grandson. He is photographing the top of his grandson’s head, rather than the boy’s face. I see this happen a lot, people taking pictures of the top side of their dearly beloved child/grandchild/pet. It has to stop!
No matter the size or price of your camera, remember to get down to the level of the subject you are shooting. Pet or kid, you are picturing their world, and they live it at their level. Let the camera enter their world and lower it to their level as well. Don’t bother about getting dirty, a good picture is worth washing your trousers.
Really, if you weren’t already doing this, start doing it today. You’ll be amazed with the results. If you take only one lesson from this entire blog, let it be this one. Get down. Please!