 One of them is Tiberius' bridge. It dates from the first century A.D. and used to cross an important river(Ariminus today, Marecchia). Since then, the course of the river was changed and the bridge only crosses a dead end canal. The bridge is just broad enough to let one car pass the pedestrians on the bridge. The picture is a long exposure at dusk, hence the 'frozen' water.
Friday, May 30, 2008
Roman Bridge
I went to Rimini last April to hold a talk at a workshop. Rimini is known to most people as a beach resort, but the weather wasn´t that good and I am not the beachy type anyway. In terms of historical things to see, Rimini is not realy a big tourist attraction, most certainly not if compared to some other Italian towns. But still, since I was there anyway, I went out for a nice little walk. Fair is fair, Rimini does have a couple of historical highlights.
One of them is Tiberius' bridge. It dates from the first century A.D. and used to cross an important river(Ariminus today, Marecchia). Since then, the course of the river was changed and the bridge only crosses a dead end canal. The bridge is just broad enough to let one car pass the pedestrians on the bridge. The picture is a long exposure at dusk, hence the 'frozen' water.
One of them is Tiberius' bridge. It dates from the first century A.D. and used to cross an important river(Ariminus today, Marecchia). Since then, the course of the river was changed and the bridge only crosses a dead end canal. The bridge is just broad enough to let one car pass the pedestrians on the bridge. The picture is a long exposure at dusk, hence the 'frozen' water.
Wednesday, May 28, 2008
Modeling tips: 7 mascara tips
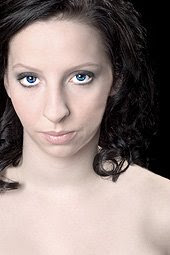 Mascara is a nice and simple way to make your lashes look longer make your eyes stand out. The ideal situation is that you have a great make-up artist for every shoot you do, and you don’t have to worry about mascara. But we all know, the world is not perfect, and sometimes you will have to do your own make-up. Then it’s good to know what you’re doing.
1) Practice first
Imagine you are at a shoot with the photographer you have been wanting to work with for quite some time. Now the make up artist does not show up and you have to apply mascara yourself. How happy would you be to find out that the great shots from this photo shoot are ruined by your lack of mascara skills? Don’t let that happen to you. Practice ‘till you drop. Make sure you can apply your mascara under any condition.
2) Apply powder before mascara
If you apply a powder before you apply your mascara, you will have less problems removing bits that fell off and prevent your mascara from running down.
3) Curl your eyelashes
Use an eyelash curler to curl your eyelashes before applying mascara. Different sources say different things about curling again after you applied the mascara. Try it at home first and see if it works for you.
4) Top to bottom
Apply mascara to the top side of your lashes, then the bottom side. This holds for both lashes. It is no important which one you do first
5) Tired?
If you are tired, you might want to use a brown mascara to create a warm effect. You may also want to put mascara on your upper lashes only to keep the view light.
6) Use fresh mascara
The stuff lasts for about three months, then it dries out. Don’t be cheap, replace your mascara in time. Make sure not to pump your mascara tube as it brings in air, which speeds up the drying. Instead, rotate the wand inside the tube.
7) Waterproof?
Limit the use of waterproof mascara. It comes of harder, which is bad for the soft skin around your eyes.
More references:
How to apply mascara, tutorial and video
Mascara guide (more tips)
Tuesday, May 27, 2008
Photography tips: dSLR or high end compact?
 Many people literally grow into photography. They have a simple point-and-shoot camera for holidays, kids and so on. Gradually, they find out photography is fun, and they want to go a step further. Now they have the choice of switching to a high end compact or a low end digital SLR (Single Lens Reflex camera). This article lists the pros and cons of both, which might help to take this decision.
Sensor size
The most important difference between a dSLR and a high end compact is sensor size. Compacts, it may be no surprise, have a smaller sensor than dSLRs. The thing you will note in everyday use is that large sensors are less prone to noise at higher ISO-levels. This means that the dSLR will perform better in low light. Sensor size has several other aspects, as you may find when reading the ‘further resources’ below.
Value for money
The high end compact is clearly a winner in terms of value for money. You’ll get a great zoom range, a macro function and sometimes image stabilization as well. If you want these functions on a dSLR, you will pay twice to three times as much, and that is without the image stabilization. Sure, you’ll have a higher image quality, but under normal light conditions, the difference will hardly be noticeable, until you start buying high quality lenses. But then the price difference will obviously explode.
Change that lens!
The great thing about a dSLR is that you can change lenses. This allows for endless possibilities (and endless expenses as well). You can equip your dSLR with high quality lenses, special interest lenses, etcetera, etcetera. This is going to cost you, both in money terms and in terms of having to carry all those lenses with you and changing lenses every time. With a compact, you have an all-in-one lens, but expansion is hardly possible.
Big is beautiful (?)
Compacts are smaller than dSLRs. Period. That implies that they are easier to carry and easier to tuck away. They are also less intrusive, making it easier to photograph in social situations. Size, small or big, is also important for how the camera feels in your hands. That’s very personal, depending on your hands and preferences.
A big dSLR makes you look like a genuine photographer, especially with an oversized telezoom lens. I am not being sarcastic here. Size does matter in how people see you. I know models that refuse to work with a photographer with a compact camera, no matter the quality of his work. And I have even seen models throwing awkward looks at my Holga and at my 35/2 prime, even though is was mounted on a dSLR. And apart from that, status is important to most people. That´s okay, it´s as valid a reason to buy a camera the any other reason.
Further resources
Making (some) sense out of sensor sizes
Extensive article on sensor size
Sunday, May 25, 2008
Modeling tips: Photographer Types (4)
Photographers, you need them for the pictures. Most of them are nice people, but they also have some peculiarities. If you know how to cope with these peculiarities, you’ll get the optimal results from your photo shoots. To help you with this, this blog publishes a series of articles devoted to photographer types. Every single photographer is a unique person. Nevertheless, knowing the type could be useful for models. None of the observations in this article imply that a certain type of photographer delivers higher quality. Each category contains both good and bad photographers. The mere fact that a photographer is shy, arrogant or flamboyant tells us nothing about the quality of his or her work. It does tell us something about the way they work though.
Some models may think that there is no need to adjust to the photographer. ‘Let them adjust to me.’ If that’s you, let me ask you whether you care about the result of a photo shoot. If you don’t, stop reading (and you might as well stop modeling too). If you do, why not take all the factors into account that you can influence?
The arrogant type
The arrogant photographer thinks he’s the center of the world. You should be happy that he is prepared to devote some of his precious time to you. At least that’s what he thinks. He is likely to become unfriendly if you do not pose exactly how he wants you to, even if he is not able to explain it clearly.
Dos and don’ts
This is one of the hardest types to work with. Your natural reaction to such a p***k would be to get mad, right? But what good would that do to your pictures? For the same reason, don’t let him get you down either. He may treat you like he does not need you, but in fact he does. If the photographer is not going to tell you you’re doing great, you’ll have to tell yourself you are.
Here’s the bottom line: Don’t get mad, get even. Be arrogant too. I don’t mean you should act the same way though. Your arrogance is far more subtle than his. By not letting his misbehavior get to you, you are actually ignoring his oversized ego. His arrogance means nothing to you. You won’t get mad or become discouraged. Your personality is so superior that his has no influence whatsoever.
You think that’s hard? It’s not, because it’s fun. Practice it a couple of times in a role-play with a friend. You’ll soon get the hang of it. And the nice bonus is, you’ll be playing with the guy and he’ll respect you for it. And since you’re shining with self confidence, you’ll shoot great pictures, which is to your mutual benefit.
Other types
The intuitive type
The artist
The shy type
The flamboyant type
The technical type
The ex-model
Thursday, May 22, 2008
CamerA AbsurdA updated
I updated my online portfolio. Here's an overview of the changes:
- A new series called 'Silence of the Lamps' is added to the site, featuring Elize and Pascal. It replaces the stock section which is no longer accessible from the front page (it's still out there though)
- Updated the 'other models' section with pictures of Pascal, Marijke and Rachel
- 'Minor of fence' was added to the selfportraits-section
That's all for now, enjoy!
Wednesday, May 21, 2008
Photography tips: Surface reflections
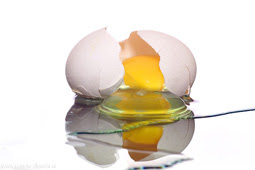
Reflections are a great way to give some depth to your pictures. This is obviously true for a reflection of a boat on a lake, but it also holds for studio shots. I will focus on the latter, as these are the type of pics where you actually make the reflection. On the lake, it’s already there, you just need to capture it. Obviously, reflections can be created in post processing if you like, but it’s much more fun doing it yourself.
What surface to use?
Obviously, we need a reflecting surface. Mirrors are reflective, and they can be used, but the result is often disappointing. Reflections become too clear, giving your picture an awkward look. But hey, you can try it and might like the result. Plain glass is a good alternative, and some types of transparent plastic may work well too. A high finish wooden board with shiny black paint is okay, but sensitive to scratches.
If you use glass, use a dark surface below it for perfect reflections. If it has a pattern, it might shine through. On the other hand, this might be want you want. In the second pic in this article, I used a striped surface to have it conflict with the round shapes of the subject and background. Whatever surface you use, make sure it is clean from dust, scratches and fingerprints. It is a big pain to remove those in post processing.
 The back-light method
The back-light method uses light from the back to create the reflection. The light does not really have to come from behind, it can be a well-lit background as well. In fact, this option is used more often. The light from the back bounces on the glass towards your lens. Note that the reflecting surface will take on the color and pattern of the background. This provides unlimited creative possibilities.
Back-lighting the scene would of course imply that the front remains underexposed, so you will probably want to use a fill flash as well. Just play around a little to find the right position and lighting ratio to light the front without disturbing the reflection. You will see it’s not that hard.
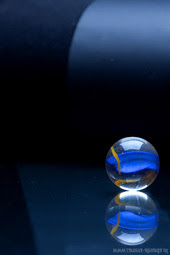 The top light method
You might not be surprised: the top light method uses light from the top to bring out the reflection. It is very suitable for abstract shapes. The reflecting surface will be black unless you put your background so close that it catches some light. By moving your background further and closer, you may vary the amount of reflection it generates. Likewise, aiming an extra light source at your background will increase its presence in the reflection. You may want to use a fill flash, but you don’t need to. The pic to the left was made with a single light source. The light coming from the top accentuates the shape of the subject. You can click on the pic to see a set up of the picture.
What surface to use?
Obviously, we need a reflecting surface. Mirrors are reflective, and they can be used, but the result is often disappointing. Reflections become too clear, giving your picture an awkward look. But hey, you can try it and might like the result. Plain glass is a good alternative, and some types of transparent plastic may work well too. A high finish wooden board with shiny black paint is okay, but sensitive to scratches.
If you use glass, use a dark surface below it for perfect reflections. If it has a pattern, it might shine through. On the other hand, this might be want you want. In the second pic in this article, I used a striped surface to have it conflict with the round shapes of the subject and background. Whatever surface you use, make sure it is clean from dust, scratches and fingerprints. It is a big pain to remove those in post processing.
The back-light methodThe back-light method uses light from the back to create the reflection. The light does not really have to come from behind, it can be a well-lit background as well. In fact, this option is used more often. The light from the back bounces on the glass towards your lens. Note that the reflecting surface will take on the color and pattern of the background. This provides unlimited creative possibilities.
Back-lighting the scene would of course imply that the front remains underexposed, so you will probably want to use a fill flash as well. Just play around a little to find the right position and lighting ratio to light the front without disturbing the reflection. You will see it’s not that hard.
The top light methodYou might not be surprised: the top light method uses light from the top to bring out the reflection. It is very suitable for abstract shapes. The reflecting surface will be black unless you put your background so close that it catches some light. By moving your background further and closer, you may vary the amount of reflection it generates. Likewise, aiming an extra light source at your background will increase its presence in the reflection. You may want to use a fill flash, but you don’t need to. The pic to the left was made with a single light source. The light coming from the top accentuates the shape of the subject. You can click on the pic to see a set up of the picture.
More resources:
Saturday, May 17, 2008
May is okay!
 My Shutterstock earnings suddenly spiked by the end of April and beginning of May. Earnings on a normal weekday were about three times their normal levels. A nice suprise, but why? Turned out the guys at Shutterstock put two of my pics in the Mother's Day lightbox on the front page. One of them was very popular and skyrocketed to the #3 position on my all-time downloads list and sold an enhanced licence. Somehow, my overall sales where so kind as to follow the lead an keep doing so after Mother's Day.
The funny thing is, I shot this picture with Valentine's Day in mind.
Friday, May 16, 2008
Modeling tips: Photographer Types (3)
Photographers, you need them for the pictures. Most of them are nice people, but they also have some peculiarities. If you know how to cope with these peculiarities, you’ll get the optimal results from your photo shoots. To help you with this, this blog publishes a series of articles devoted to photographer types. Every single photographer is a unique person. Nevertheless, knowing the type could be useful for models. None of the observations in this article imply that a certain type of photographer delivers higher quality. Each category contains both good and bad photographers. The mere fact that a photographer is shy, arrogant or flamboyant tells us nothing about the quality of his or her work. It does tell us something about the way they work though.
Some models may think that there is no need to adjust to the photographer. ‘Let them adjust to me.’ If that’s you, let me ask you whether you care about the result of a photo shoot. If you don’t, stop reading (and you might as well stop modeling too). If you do, why not take all the factors into account that you can influence?
The technical type
Does your photographer use a light meter? Does it take him an hour to take the first shot? And does he get it right at his first try, in manual mode? Chances are, you just met a technical photographer. This person knows exactly what he’s doing. He can calculate the correct aperture and shutter speed straight from the head. You can count on loads of knowledge about photography, and he uses it too! He may be very strict in giving directions: “No, your finger should be half an inch further to the left”. But he is more likely to be so occupied with technicalities that he leaves the posing to you. This is also the type of photographer that is most likely to use a film camera on the side (apart from the artist, that is).
Dos and don’ts
You are lucky. You found a photographer that will create perfect photos. All you have to do is strike the right poses. If you can do that without directions, count on a great result. Sorry, no chatting this shoot. He is not going to come loose, he’s busy. And for your sake, let him be.
Unless you are really interested in the subject, don’t ask him any technical questions. Before you know, he will answer them. Thoroughly. It’s okay if you’re not interested in technicalities, he counts on you not to be interested. But if you start him and loose interest after a couple of minutes, you’ll hurt his feelings.
The main problem for you is that he might devote half or more of his time to the lights rather than the model. You will just have to wait. Bring a magazine or find something else to kill the time. Don’t get annoyed, unless ‘annoyed’ is the look you want for your portfolio. Be patient, he is working on the perfect result for your pictures.
The same holds for post processing. He is going to take his time to get it right. And he will get it right. Give him time. If you are on a TFP/TFCD shoot, you might want to tell him in advance to limit the number of pictures you want. This speeds up the process without harming quality. After all, who uses more than 5 pics from one shoot in a portfolio?
If you are going to a shoot with a technical photographer, be prepared. Make sure you have practiced a number of poses, so you can strike them without directions. The same holds for facial expressions. And bring something to read.
Other types
The intuitive type
The artist
The shy type
The flamboyant type
The arrogant type
The Ex-model
Wednesday, May 14, 2008
Photography tips: cropping and aspect ratio
Cropping, or cutting the edge from a picture in post processing, may sometimes come as a useful trick to improve your composition or to remove unwanted elements from your picture. Cropping may also be used to change the aspect ratio of your pic, and hence change its impact. The aspect ratio is defined as the ratio between the longest and the shortest side of your pic. Changing your aspect ratio has implications for the composition of your pic. Some combinations work better than others.
 1:1
1:1
The square format is often used in medium format cameras as well as in many Lomo (often using medium format film cameras. This gives a picture a traditional feel. Depending on the pic, a professional or experimental look that the picture already had, may be enhanced by the square crop. If some site or contest prescribes a maximum size for the longest side, you may want to maximize total pic size by using the square crop. Likewise, the visibility of a square thumbnail in a large group of thumbnails is better. Square pics work well with centered compositions, spirals and portraits. For portraits, center the pic at the vertical axle, and put the eyes on 2/3rd.
3:2
The 3:2 (or 6:4) aspect ratio is commonly used for 35mm film and for some medium formats. Magazines very often use this format as well, as do many books and postcards. People will immediately recognize 3:2 as a photograph, and it will make your pic look as if it was taken with a SLR-camera. (which doesn’t mean a thing, but some people tend to equate SLR to ‘professional’). Pictures with an aspect ratio of 3:2 work great with the rule of thirds and with all composition rules using diagonals (leading lines, S-curve, vanishing point, etc).
4:3
Most modern digital compact cameras use the 4:3 aspect ratio. This ratio is also very common for TV- and computer screens. Some people have the feeling that the 4:3 landscape looks more familiar than a 4:3 portrait. This does make sense, as TVs and computer screens are hardly ever in the portrait position. Some books and magazine use the 4:3 aspect ratio in portrait though. The 4:3 aspect ratio seems to fit almost any composition.
 16:9
16:9
The 16:9 aspect ratio is derived from wide screen televisions and –before that- from movie theatres. No wonder it has a somewhat luxurious impact and no wonder it looks so weird in portrait. This aspect ratio goes very well with landscape shots and with shots that could have been movie stills.
More resources:
Wikipedia on aspect ratios
DPChallenge Square crop challenge results (2006)
1:1The square format is often used in medium format cameras as well as in many Lomo (often using medium format film cameras. This gives a picture a traditional feel. Depending on the pic, a professional or experimental look that the picture already had, may be enhanced by the square crop. If some site or contest prescribes a maximum size for the longest side, you may want to maximize total pic size by using the square crop. Likewise, the visibility of a square thumbnail in a large group of thumbnails is better. Square pics work well with centered compositions, spirals and portraits. For portraits, center the pic at the vertical axle, and put the eyes on 2/3rd.
3:2
The 3:2 (or 6:4) aspect ratio is commonly used for 35mm film and for some medium formats. Magazines very often use this format as well, as do many books and postcards. People will immediately recognize 3:2 as a photograph, and it will make your pic look as if it was taken with a SLR-camera. (which doesn’t mean a thing, but some people tend to equate SLR to ‘professional’). Pictures with an aspect ratio of 3:2 work great with the rule of thirds and with all composition rules using diagonals (leading lines, S-curve, vanishing point, etc).
4:3
Most modern digital compact cameras use the 4:3 aspect ratio. This ratio is also very common for TV- and computer screens. Some people have the feeling that the 4:3 landscape looks more familiar than a 4:3 portrait. This does make sense, as TVs and computer screens are hardly ever in the portrait position. Some books and magazine use the 4:3 aspect ratio in portrait though. The 4:3 aspect ratio seems to fit almost any composition.
16:9The 16:9 aspect ratio is derived from wide screen televisions and –before that- from movie theatres. No wonder it has a somewhat luxurious impact and no wonder it looks so weird in portrait. This aspect ratio goes very well with landscape shots and with shots that could have been movie stills.
More resources:
Wikipedia on aspect ratios
DPChallenge Square crop challenge results (2006)
Friday, May 9, 2008
A Ghost in Gent?
About two weeks ago, I went to the beautiful Belgian city Gent for a meet with models and other photographers from Holland and Belgium. Apart from my normal camera, I carried my Holga, loaded with a heavily overaged film (Kodak Vericolor II (C-41) 100 ASA). The fun with overaged film is that you have no idea what the outcome will look like. It may be totally normal, extremely washed out, nothing at all, anything can happen. I had never before used film that was so heavily overaged as this one: its expiry date was October 1982, more than 25 years ago
The funny outcome was that there was quite a difference between the pics after developing them. Some had a blue cast, others red or yellow. They all had a red/purple flair at the bottom and lost contrast as well as sharpness. Not very good pics by any technical standards, but that’s not why one uses overaged film.
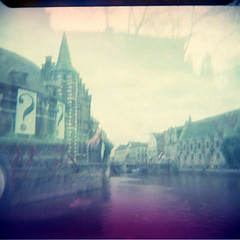 One of the pics was a double exposure of a model shot and an architecture shot, that I made by accident. It turned out quite nice because of the placing of the hand and the question mark billboards on the building. The pic as you see it here comes almost straight from the scanner. The only post processing I did was some minor dust removal and sharpen after resize. All colour casts and weird things you see are either caused by the age of the film, the double exposure, or the twist in your mind. You can check out a larger version at my Flickr portfolio by clicking on the picture.
The funny outcome was that there was quite a difference between the pics after developing them. Some had a blue cast, others red or yellow. They all had a red/purple flair at the bottom and lost contrast as well as sharpness. Not very good pics by any technical standards, but that’s not why one uses overaged film.
One of the pics was a double exposure of a model shot and an architecture shot, that I made by accident. It turned out quite nice because of the placing of the hand and the question mark billboards on the building. The pic as you see it here comes almost straight from the scanner. The only post processing I did was some minor dust removal and sharpen after resize. All colour casts and weird things you see are either caused by the age of the film, the double exposure, or the twist in your mind. You can check out a larger version at my Flickr portfolio by clicking on the picture.
Wednesday, May 7, 2008
Great hobbies for models
 Stop! Do you think your hobby or hobbies should be tailored to your modeling career? If so, you are nuts. Pick a hobby you like, not one that suits your career. Hobbies are supposed to be nice pastimes, not work. However, should one or more of the hobbies below appeal to you, give them a try. As a nice side effect, they might enhance your modeling career. And maybe, just maybe, you’ll find a career that’s even more fun than modeling.
Join a theatre group
Become an actor. Take acting lessons if you feel the need, but joining a group is at least as important, as you will learn from your fellow actors. Acting and modeling are basically the same thing, but in a different context. For actors, striking a pose or a facial expression is a natural thing to do. It is my personal experience that many models would be better models if they only knew how to reproduce a certain emotion by facial expression and body language. Likewise, technical aspects like breathing techniques and posture are important for both acting and modeling.
Besides, being in a theatre group is a great way to expand your network. You might meet other models, photographers and clients that you would normally not have met. Having theatre experience is an asset on your model resume too. Photographers are more likely to hire you, since they know you trained yourself to strike a pose or reproduce emotions.
Dance!
Dancing is also great for models, and I don’t mean dancing in a strip club (although for some types of models…). Whether you like classical ballet, Jazz, Hiphop, modern dance, streetdance or even tap dance, dancing is good for a model. It is obviously a great workout. And since it’s more fun than fitness (to most people, that is), it’s easier to keep up. Like acting, dancing will enhance your posture and breathing and you will learn to visualize the effect of certain poses and movements.
Dancers, models and actors are often in the same talent competitions and sometimes even represented by the same agencies. Doing both will therefore increase your visibility to scouts and agents. So do make sure to bring your comp card to a dance contest and let the organizers know that you are also a model, so in case someone does not show up, they can stop searching for a replacement right away. They found you.
Be a make-up artist
It’s pretty obvious that being able to do your own make-up is an asset for models. If that were all, just get a base course for those events where the make-up artist does not show up. But there is more. If you are anything more than a base-level make-up artist, your skills become a big plus. Portfolio shoots will double in value as they can be used for both your portfolios. Keep working with other make-up artists and other models as well, to keep some diversity in your portfolios.
Being a make-up artist obviously helps you to expand your network in the modeling scene. You will get to meet other models, photographers, agencies and clients. You may also learn as a model from a shoot that you are attending as a make-up artist and vice versa.
Why don’t you design your own fashion?
True, fashion design is a bit more specific than the hobbies mentioned above. But why wouldn’t you? As a model, you’ve seen a lot of fashion. You probably met a lot of designers too. It is time consuming, but that is what hobbies are supposed to be, remember? If you like creating things, this is a great hobby.
Think about it, your closet being filled with all kinds of great stuff, and you will even know which ones to combine. All the advantages mentioned under make-up artists hold for fashion design too: your ability is an asset, both your portfolios will benefit from a shoot and your network expands greatly. Furthermore, you will be able to understand a designer’s needs and develop your modeling skills likewise and vice versa, making you both a better model and a better designer.
More resources:
Models who also act
How NOT to combine modeling and dancing
Tuesday, May 6, 2008
Photography tips: basic post processing

I know that some photographers are very reluctant to do any post processing. I am not going to tell them they are wrong. I am not going to explain that post processing is exactly what the photo lab did when they developed your film in the old days. I am not going to tell them it’s okay to correct for the minor imperfections of their gear. It’s a waste of time and energy, they will most certainly not listen. Somehow, these people got the silly idea that the 0’s and 1’s on their chip are the truth, the whole truth and nothing but the truth, and that post processing implies that the truth is altered. They will stick to this idea, and they are entitled to their mistake.
Too bad for them, they are missing out on an easy opportunity to enhance the quality of their pictures. This article describes some basic tips that help improving pictures. Nothing big, no great secrets revealed here, no magic way to recover a bad picture. In fact, post processing can hardly ever be used to make a bad pic into a good one. But you can make your nice picture pop, and have it draw attention. The article draws on the use of Photoshop Elements, but the same techniques may be used in Photoshop CS, Paint Shop Pro, Gimp and many other programs. The terms used may be slightly different though.
Too bad for them, they are missing out on an easy opportunity to enhance the quality of their pictures. This article describes some basic tips that help improving pictures. Nothing big, no great secrets revealed here, no magic way to recover a bad picture. In fact, post processing can hardly ever be used to make a bad pic into a good one. But you can make your nice picture pop, and have it draw attention. The article draws on the use of Photoshop Elements, but the same techniques may be used in Photoshop CS, Paint Shop Pro, Gimp and many other programs. The terms used may be slightly different though.
 Increase contrast
Most lenses (except the very good ones) loose some contrast on the way from the actual thing to the picture on your chip. You will have to bring it back in post processing. Simply create a levels adjustment layer (using curves is fine too, but they require an add-on in Elements). You will now see a histogram. Check if there is some ‘empty room’ to the sides of the histogram and slide the white and black point towards the ends of the histogram. You can slide both sides up to 20 points further, depending on the steepness of the outer slopes of the histogram. The higher contrast will make the pic look stronger and sharper. Make sure to check your highlights. If they get burned, slide the white point a little further to the right or use a grey brush on the mask to apply the levels selectively.
 Increase saturation
Like in the case of contrast, some lenses loose some of the color in your original. Again, you can use post processing to bring it back. You may even want to exaggerate a little, provided you have your white balance correct. Increasing saturation by 10 to 20 percent should do the trick. Like before, check your highlights. Increasing saturation may cause burning highlights as well.
 Sharpen
Finally, sharpen your picture, either using USM or the simple sharpen tool. There is no fundamental difference between them. USM gives you a little more control, but I find the sharpen tool to be accurate most of the time. If you use a prime or a very good zoom, there will be no need to sharpen at full size. As soon as you resize the pic however, some sharpness may be lost, and you need to reintroduce it. You can sharpen more than once, but forget about saving a pic that is blurred by camera shake. Sharpening should be done at the final stage of post processing to prevent jpg-artifacts. This holds especially for saving (as .jpg) and resizing.
More resources:
Levels versus Curves
Understanding histograms
Some nice-to-know reading about photo manipulation
Subscribe to:
Posts (Atom)