If you found this blog, you are probably interested in photography tips, modelling tips, or both. Chances are that the specific tip you were looking for isn’t here. Yet. Why not ask me? I’ve got a long list of tips to discuss, but none of them has a very high priority. I’ll squeeze in any tip that I know my readers are interested in. So all you have to do is let me know.
You want to know how to photograph fire? Or have the difference between a soft box and a beauty dish explained to you? Or maybe you are a model and want to know all about com cards? Anything else I might not be thinking of yet? Just leave a comment below and I’ll try to make an article out of it. Provided I know anything about it, that is.
Friday, March 28, 2008
Thursday, March 27, 2008
Modelling tips: can I trust that photographer?
As a model, you will get to work with photographers. Most of them are nice people, sharing your goal: making great pictures. A small minority has other goals however. They are either after your money or your body. This article is not meant to scare you, it will merely provide you a few tips to help you keep safe. These tips can not offer you any guarantee, but they will decrease the risk of you meeting up with a ‘photographer’ with the wrong goals. Also remember to use your own judgement as well. If it does not feel right, it probably isn’t right.
 A first sign that someone has the wrong goals, is that he or she is trying to avoid being tracked. A photographer that has no URL of his own or is reluctant to give you a fixed phone number or an address might be trying to hide something. It does not mean the person has bad intentions by definition though. Good reasons for not wanting to give out these details do exist, so it’s merely a sign to be careful, nothing more. Some modelling sites require photo-ID from their members. Although this is not a watertight guarantee either, photographers at these sites are easier to track and therefore less likely to have illegal intentions.
Always check a photographer’s portfolio. You should do that anyway, since you don’t want to work with someone that delivers crappy pictures, right? But it’s also good for your safety. If the photographer is a real photographer, he or she is more likely to want to make nice pics than anything else. Also check for remarkable style difference, which may (I emphasize: may) be a sign that the portfolio is not the actual work of the photographer. It’s a good sign if an online portfolio contains links to the models. It means the photographer is not afraid of you contacting those models, whereas someone with bad intentions would be. If you want to, do contact the models, they won’t mind. They also realize safety is important.
You may want to try to google the photographers name: bad experiences are likely to be discussed in modelling forums or blacklists. Obviously, someone with bad intentions is likely to work under different names, so again, no guarantee here.
If you receive an offer that seems to good to be true, it probably is. Don’t turn it down immediately, but do some extra checking. These offers are very likely to be scams.
Tell the photographer you will take someone with you. Again, there are good reasons for a photographer not to want that, and he or she might want to set conditions for your chaperone. Conditions are fine, but if the photographer seriously insists on not taking someone with you, be extra careful. Whether you really bring someone is up to you, just announcing a chaperone will often be enough to scare the bad guys away.
Discuss the shoot with your photographer by phone, chatbox or email. Does he suggest weird things or make sexual remarks? Be suspicious. While discussing the shoot, make sure your expectations match that of the photographer, both with regards to the content of the shoot as to the conditions on payment and/or delivery of photos.
Finally, when going to the photographer, take a contract with you and make sure someone knows where you are and how to reach you, just in case.
And let me emphasize again: most photographers are nice and honest people, and often even fun to work with. So don’t be scared, just be prepared.
More resources
More tips and further reading
About agency scams
Site dedicated to model safety
Article containing a helpful checklist
A first sign that someone has the wrong goals, is that he or she is trying to avoid being tracked. A photographer that has no URL of his own or is reluctant to give you a fixed phone number or an address might be trying to hide something. It does not mean the person has bad intentions by definition though. Good reasons for not wanting to give out these details do exist, so it’s merely a sign to be careful, nothing more. Some modelling sites require photo-ID from their members. Although this is not a watertight guarantee either, photographers at these sites are easier to track and therefore less likely to have illegal intentions.Always check a photographer’s portfolio. You should do that anyway, since you don’t want to work with someone that delivers crappy pictures, right? But it’s also good for your safety. If the photographer is a real photographer, he or she is more likely to want to make nice pics than anything else. Also check for remarkable style difference, which may (I emphasize: may) be a sign that the portfolio is not the actual work of the photographer. It’s a good sign if an online portfolio contains links to the models. It means the photographer is not afraid of you contacting those models, whereas someone with bad intentions would be. If you want to, do contact the models, they won’t mind. They also realize safety is important.
You may want to try to google the photographers name: bad experiences are likely to be discussed in modelling forums or blacklists. Obviously, someone with bad intentions is likely to work under different names, so again, no guarantee here.
If you receive an offer that seems to good to be true, it probably is. Don’t turn it down immediately, but do some extra checking. These offers are very likely to be scams.
Tell the photographer you will take someone with you. Again, there are good reasons for a photographer not to want that, and he or she might want to set conditions for your chaperone. Conditions are fine, but if the photographer seriously insists on not taking someone with you, be extra careful. Whether you really bring someone is up to you, just announcing a chaperone will often be enough to scare the bad guys away.
Discuss the shoot with your photographer by phone, chatbox or email. Does he suggest weird things or make sexual remarks? Be suspicious. While discussing the shoot, make sure your expectations match that of the photographer, both with regards to the content of the shoot as to the conditions on payment and/or delivery of photos.
Finally, when going to the photographer, take a contract with you and make sure someone knows where you are and how to reach you, just in case.
And let me emphasize again: most photographers are nice and honest people, and often even fun to work with. So don’t be scared, just be prepared.
More resources
More tips and further reading
About agency scams
Site dedicated to model safety
Article containing a helpful checklist
Tuesday, March 25, 2008
Photography tips: bring out texture
Texture, unwanted as it may be by the ageing model, can bring pictures to life. Whether you are photographing food, objects, landscapes or character portraits, bringing out the texture in your pics adds to their realism. Bringing out texture by (over)sharpening in post procesing is bound to lead to disappointing results. Good lighting is much more effective and will make your viewers want to reach out and touch your pictures.
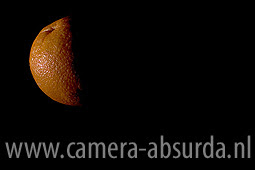 To understand how light affects texture in your pictures, you must first realize that texture basically consists of differences in hights. Take an orange for example. The skin of an orange is smooth, but is has tiny little holes all over. Now let’s light the orange from the front. The light will fill all the little holes and we will not (well, hardly) be able to see them. If we light the orange from the side however, all the little holes will be filled with shadow, and therefore show up as dark spots.
It is as simple as that: light straight from the front: almost no texture. Light from the side: vissible texture. That’s why ring flashes are so usefull in model photography. They give light straight from the front of the lens and hide most of the texture in the model’s skin better than any post processing can. But in most other type of photographs, we do want texture. So if you want some detail in your landscape shots, keep the sun to the side (which emphasizes the effect of polarizers as well, see last week's article). When you are shooting a character portrait of your grandpa, place him with one side to the window. For food photography, use at least one light source from the side to bring out the texture of the food. And for pictures of your furry pet, well, I think you know by now.
You can vary the amount of texture in two ways. With a single light source, turn your light source around the subject from front (little texture) to side (a lot of texture). If you can not move the lightsource, turn your subject. If you have more light sources available, use one from the front and one from the side and vary their relative strength (we will have an article on lighting ratio shortly) and see what happens. Experiment untill you are pleased with the result.
More resources
Using light to create texture in your photography
The importance of texture
5 ways to make your texture photos pop
Saturday, March 22, 2008
44
Wednesday, March 19, 2008
Modelling tips: portfolio selection
 A great model has a great portfolio. That requires two things: having good photos and picking out the right one for your portfolio. This article focuses on the latter. How will you –among the tons of brilliant pictures you have – pick the ones that sell you?
Decide where you want to go
Many models make the mistake of letting their portfolio be a reflection of what they have done in the past. That’s okay if you want to keep doing what you were doing. But if you are heading in a specific direction, gear your portfolio in that direction as well. Don’t fill it with portraits if you are aiming for a career in fashion. A portrait-dominated portfolio will yield you portrait shoots. Photographers and agencies select models on the basis of what they see in portfolios. If fashion is what you want, the lion’s share of your portfolio should be fashion pictures. Have you stopped posing nude? Remove the nudes from you portfolio.
Great pics only
Be critical. Adding one mediocre picture to 9 very good ones, will decrease the WOW-factor of your portfolio. A portfolio with a low number of good pictures tells me this is a good model with little experience. Add a couple of mediocre pictures to it, and the portfolio will tell me this is an inexperienced model with varying performance and an inability to choose. Which one would you like to be?
Diversify

Even if you are specializing in a certain direction, make sure your portfolio reflects your ability to look different in every picture. The more ‘looks’ you are able to convey in a convincing way, the more modeling jobs you will be eligible for. Use different themes, different photographers, different outfits, different make-up artists, different expressions. Show them how versatile you are.
Kill your darlings.
“Ah, my first paid assignment”, “That photographer was such a nice guy”, ”That dress cost me a fortune” and “I just love that car I am posing in front of” are not good reasons to keep a picture in your portfolio. The mere fact that a photographer, fellow model or make-up artist is a friend of yours is not a very good reason either. Don’t let your emotions decide what’s in your portfolio. Picture quality is the one and only measure to go by.
More resources
Minor site update
I have done a couple of minor updates to my website, CamerA AbsurdA. I added a couple of recent self portraits, and made some cosmetic changes to the stock-section. I also added a link to this blog. There is certainly more to come, as I am starting to plan model shoots again.
Monday, March 17, 2008
Photography tips: polarizing filters
 Polarizing filters are among the most expensive, but als0 among the most useful filters for your camera. They are hard –if not impossible- to mimic in post-processing.
One may succeed in visually resembling some of the results of a polarizing filter with software post-processing, but not all of them, particularly those reducing reflections. For digital photography, circular polarizers are recommended, rather than lineair polarizers. The text below is written with circulair polarizers in mind and might not be entirely valid for linear polarizers.
Polarizers are often used to reduce reflections, e,g, from water or glass. A polarizer may even be used to look through a glass window on a sunny day that you would not be able to see through with your bare eye.
Landscape photographers love the polarizer for its ability to deepen the blue in skies, and hence increase he contrast with the white clouds. It helps preventing blown out skies by eliminating the reflection of light on the tiny water droplets in the atmosphere. Eliminating sunlight’s reflections also helps boosting color saturation in general.

A general advise for use would be to keep the sun at 90° to you (i.e. to your side). This will help your polarizer to have the greatest effect. Rotate your polarizer so that the dark side is above. However, both rules can and should be violated to create artistic effects. Let trial and error be your teachers. Keep in mind that using a polarizer with the sun in front of you will have no effect.
Note that the use of a polarizer comes at the expense of one or two stops, so you best use them under good light conditions. Also note that reflections ad blown out skies are most likely when the sun shines bright, so that’s when to use your polarizer. For wide angle lenses, a slim polarizer (even more expensive) reduces the risk of vignetting.
More resources
More facts and tips
Scientific explanation in wikipedia
More scientific explanations
A nice click and drag application to show the effect of a polarizer
Saturday, March 15, 2008
Modelling tips: posing
 Posing is an essential part of many types of model photography. Some photographers will tell you exactly what to do, others may give some directions and yet other photographers will leave it up to you. In any case, you will perform better if you know what to do. Don’t just stand there: pose! Here are some tips:
Imitate and innovate
Why reinvent the wheel? You only need to look at poses of other models and try to match them. Once you succeed, take it a step further. Try small changes: bend your arm, twist your leg, and see if you can improve the pose. Examples are everywhere: check the mags, photographers and other models’ portfolio’s. You may also want to use posing books as an example (Here is a free one). Collect poses that you like, either on paper or on disk. You can also bring some of these examples to a shoot to discuss them with the photographer.
The mirror is your friend

No, it is not weird to stand in front of the mirror and practice your poses. It may feel a bit awkward at first, but it helps. Have you ever wondered why dance studios have mirrors on the wall? It’s because dancers will have to see the effect of their actions. It’s no different for models. Show yourself the effect of your actions; get familiar with your own poses and facial expressions. When a pose looks good in the mirror, it is very likely to look good at a pictur.? The mirror will also help you to figure out which side of your face photographs better.
Put the accents where you want them
Arching your shoulders back, focuses the viewer’s attention to your bustline. Rotate your upper body slightly at the waist to give the impression of a thinner waistline. Similarly, crossing one leg over in front of the other one will make your thigh region look thinner. Don’t overdo though, you’ll look like a kid that needs a bathroom break.
More resources
A posing guide by Roland Berg (pdf)
More useful tips
Do’s and don’ts for your leg and feet
Model Posing Tips from a Professional Photographer
Friday, March 14, 2008
Photography tips: white backgrounds
 Product photographers often photograph their objects against a white background. This makes the product stand out more and it allows a graphic designer to make isolations for use in other pictures. Photographing against a white background is done in four easy steps.
Use white
I know it sounds silly, but believe me, some people use off-white backgrounds to photograph an object “on white”. It is not impossible, but using an actual white background makes it much easier to have your object stand out from the background. I prefer paper backgrounds, but textiles or plastics work as well.
Overexpose
The light meter in your camera will notice a large white surface and think that the picture is very bright. Left to itself, your camera will underexpose the picture with the white background. So you need to tell your camera to compensate exposure, probably between one and two stops. Determine the exact amount of compensation by trial-and-error, without overexposing your actual subject.
Soft lighting
Using direct lighting is probably one of the most common mistakes made by photographers. Direct lighting causes reflections and harsh shadows. We don’t want those in general and we certainly don’t want those when shooting an object on white. So you need soft lighting. Diffusing and/or bouncing the light create soft lighting. Professional product photographers use light tents or light boxes for diffusing the lights. Light tents are simple frames, covered with a thin layer of white material that diffuses light. The light inside a light tent is softer and bounces around the inside of the tent, helping to reduce shadows. Below are two links to build one yourself. I have built a similar one and it works just fine, as you can see from the pics in this blog.
Post process
The final step is done behind your computer. You should not rely on post processing alone. Of course, if you are very patient, you can isolate any object in Photoshop, but that’s not our
I did not mention what type of lights to use, did I? That’s because it is not important. You may use sunlight, daylight bulbs, flash light or even a simple bulb. As long as you stick to the above and correct for white balance deviations, you’ll do fine.
More resources:
Build a do it yourself light box
Different way to build a light box
Tutorial for post processing
Tutorial on how to use isolated items in a picture
Wednesday, March 12, 2008
DRSSDTKLL
 This is a group portrait from DRSSDTKLL, my biggest project ever. It involved 6 models, 3 make-up artists, and two photo assistants: Miklos and Wiljo. Larisa Katz did a fabulous job styling the models. The shoot was shot in a small castle in the South of The Netherlands, which is now in use by a hotel and conference centre.
We worked the entire day with this large team, using two rooms of the castle, one large conference room and a small bar. We used only two monoblocks during the shoot. One of them (with a softbox) is to the left in front (lighting Clemy, the girl to the left), the second (umbrella) is to the left behind the wall. On the right hand side, the two assistents are holding large reflectors, both in front and behind the wall.
Subscribe to:
Posts (Atom)