 When there is not enough light to take a picture, you can use a flash. True. But it is not the whole truth. Have you ever tried using the flash during the day? It is not as silly as it may sound. In fact, in temporary fashion photography, combining flash and daylight is the rule rather than the exception.
Basic fill flash
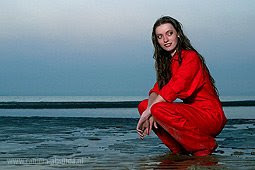
Have you ever been shooting people in broad daylight? Did you notice the so-called ‘panda-bear effect’, with a circle of shadow around your subject’s eyes? Not a very pretty sight. Besides, a portrait where the eyes are invisible is not really a very good portrait. That’s where the fill flash comes in. It lightens up the shadows, giving you a much better portrait, as well as a little more flexibility with respect to choosing your position relative to the sun. You can either use your on-camera flash or a separate one. Harsh flash shadows, a big problem of ‘normal’ on-camera flash photography, are not really an issue, as daylight chases them away. You may want to use a ring flash, an omnibounce or a snap-on soft box to change the character of the light.
Contre jour
Now take it a step further. Since you are lighting your model’s face anyway, you might as well shoot right into the sun. Well, not really into the sun of course. Keep the sun behind your model and use your (fill) flash to light the model’s face and front. The sun now acts as a backlight, giving your model’s hair a nice glow. Normally, you would only get silhouette, but thanks to the flash, the front of the model becomes visible. With some practice you might even get to use the sun’s flare in a desirable way. This is a technique often used in modern fashion photography.
Let’s play around a little
Now we have two light sources, the sun and your flash. Having two light sources means you can change the lighting ratio. Obviously, there is no way you can adjust the sun’s strength, but there are other options. Most modern flash units are equipped with Through-The-Lens (TTL)-metering: flash metering occurs after the shutter has been opened and flash output is adjusted accordingly. The output of TTL flashes can be adjusted to cater for you specific needs as well. Check the third link below for a good tutorial of using the TTL-flash for fill.
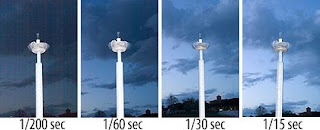
If you do not have a TTL-flash, there is another (older) way to do things. You probably know that your flash sync speed is about 1/200 to 1/250 sec. If you set a shorter shuttertime (say 1/500 sec), you’ll note a dark ban on the photograph, which is the shadow of your closing shutter curtain. But how about longer shutter speeds? They won’t affect your flash, nor the amount of flash light that falls on you picture. It does affect the amount of ambient light though. So if you want to have a brighter background (behind your flash-lit subject), expand your shutter time. For darker backgrounds, use a shorter shutter time. Depending on the strength and placement of your flash, you can even make a bright day look like twilight. Note that this trick works with TTL-flashes as well, but adjusting flash output is a lot simpler.
More resources:
A basic tutorial
Fill flash can be used in landscape photography too
Fill flash with a TTL flash
An extensive article on the TTL System (based on the Nikon version, but helpful to other brand owners as well.
No comments:
Post a Comment