Reflections are a great way to give some depth to your pictures. This is obviously true for a reflection of a boat on a lake, but it also holds for studio shots. I will focus on the latter, as these are the type of pics where you actually make the reflection. On the lake, it’s already there, you just need to capture it. Obviously, reflections can be created in post processing if you like, but it’s much more fun doing it yourself.
What surface to use?
Obviously, we need a reflecting surface. Mirrors are reflective, and they can be used, but the result is often disappointing. Reflections become too clear, giving your picture an awkward look. But hey, you can try it and might like the result. Plain glass is a good alternative, and some types of transparent plastic may work well too. A high finish wooden board with shiny black paint is okay, but sensitive to scratches.
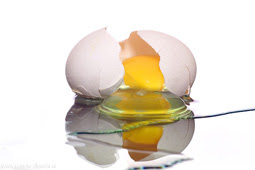
If you use glass, use a dark surface below it for perfect reflections. If it has a pattern, it might shine through. On the other hand, this might be want you want. In the second pic in this article, I used a striped surface to have it conflict with the round shapes of the subject and background. Whatever surface you use, make sure it is clean from dust, scratches and fingerprints. It is a big pain to remove those in post processing.
 The back-light method
The back-light method uses light from the back to create the reflection. The light does not really have to come from behind, it can be a well-lit background as well. In fact, this option is used more often. The light from the back bounces on the glass towards your lens. Note that the reflecting surface will take on the color and pattern of the background. This provides unlimited creative possibilities.
Back-lighting the scene would of course imply that the front remains underexposed, so you will probably want to use a fill flash as well. Just play around a little to find the right position and lighting ratio to light the front without disturbing the reflection. You will see it’s not that hard.
 The top light method
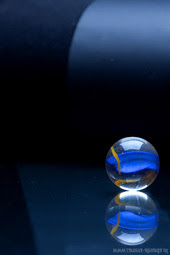
You might not be surprised: the top light method uses light from the top to bring out the reflection. It is very suitable for abstract shapes. The reflecting surface will be black unless you put your background so close that it catches some light. By moving your background further and closer, you may vary the amount of reflection it generates. Likewise, aiming an extra light source at your background will increase its presence in the reflection. You may want to use a fill flash, but you don’t need to. The pic to the left was made with a single light source. The light coming from the top accentuates the shape of the subject. You can click on the pic to see a set up of the picture.
What surface to use?
Obviously, we need a reflecting surface. Mirrors are reflective, and they can be used, but the result is often disappointing. Reflections become too clear, giving your picture an awkward look. But hey, you can try it and might like the result. Plain glass is a good alternative, and some types of transparent plastic may work well too. A high finish wooden board with shiny black paint is okay, but sensitive to scratches.
If you use glass, use a dark surface below it for perfect reflections. If it has a pattern, it might shine through. On the other hand, this might be want you want. In the second pic in this article, I used a striped surface to have it conflict with the round shapes of the subject and background. Whatever surface you use, make sure it is clean from dust, scratches and fingerprints. It is a big pain to remove those in post processing.
The back-light methodThe back-light method uses light from the back to create the reflection. The light does not really have to come from behind, it can be a well-lit background as well. In fact, this option is used more often. The light from the back bounces on the glass towards your lens. Note that the reflecting surface will take on the color and pattern of the background. This provides unlimited creative possibilities.
Back-lighting the scene would of course imply that the front remains underexposed, so you will probably want to use a fill flash as well. Just play around a little to find the right position and lighting ratio to light the front without disturbing the reflection. You will see it’s not that hard.
The top light methodYou might not be surprised: the top light method uses light from the top to bring out the reflection. It is very suitable for abstract shapes. The reflecting surface will be black unless you put your background so close that it catches some light. By moving your background further and closer, you may vary the amount of reflection it generates. Likewise, aiming an extra light source at your background will increase its presence in the reflection. You may want to use a fill flash, but you don’t need to. The pic to the left was made with a single light source. The light coming from the top accentuates the shape of the subject. You can click on the pic to see a set up of the picture.
More resources:
No comments:
Post a Comment