Showing posts with label post processing. Show all posts

Saturday, January 24, 2009

Photography tips: Bad weather

Photographers are heavily biased towards nice weather. If we were to judge the word by pictures alone, we would be inclined to believe that we live under a clear blue sky for 90% of the time. Of course, we don't. Photographers just don't like getting wet, so they only go out when the weather is nice. Such a shame, since bad weather can be a very interesting subject.

Bad weather means bad light
Unfortunately, that is true. You won't have much light and the light is pretty flat. But there are ways around that. You will probably still have enough light if you use a fast lense, and high ISO-values are not much of a problem for cloudy skies. Nevertheless, pick your weather carefully. Mixed weather (clouds with showers and some sunny spells) is best. It will give you better light and more spectacular clouds, with more depth in your pictures. If you're photographing a subject rather than just clouds, try to keep the sun behind you. Heavy clouds and backlight are not a good lighting combination for anything other than silhouettes.

Post processing
The flat light of a cloudy day implies a little extra work on post processing your pictures. The most important issue here is contrast. Look at the two versiona of the same picture to the left (click for larger versions). The picture is taken with a lens that renders good contrast. Nevertheless, the unedited (upper) pic is a bit flat. That's because of the flat light.
All I did in post processing was adding three layers of level adjustments, creating more contrast, as well as the slight color change, that adds somewhat to the spookyness of the weather. Obviously, the very dark tones are applied to clouds rather than the foreground.
It's okay if your pics are a little darker than what would normally be considered correct exposure. After all, the message you are trying to convey is that of bad weather. This implies a little darkness. You can either do this in post processing or use exposure correction while shooting.

Thursday, September 11, 2008

Photography tips: night photography

Night photography can be very rewarding, especially for romantic subjects and for nicely lit architecture. Famous landmarks may often get an extra dimension on night photos, as do fountains. This article discusses some issues that might be helpful in improving your night pictures.

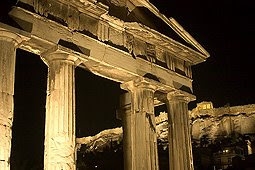
The obvious thing about night photography is that it comes at low light levels. This can be overcome by higher ISO, larger apertures or longer shutter times. After dusk, you will probably have to rely on all three of them. The most common thing to do with longer shutter times is to use a tripod, but you do not always have to. I shot the picture to the left handheld, while leaning against a sturdy fence. Of course, using a fast (and lightweight) prime makes quite a difference. The links below the article provide some useful alternatives to tripods, that may be very useful when traveling.

I have one tip that may sound silly because it’s so simple. But I know I forgot a couple of times and at those times I can really curse myself for being such a dumbass. So do keep in mind to clean you lens surface. If it is only a bit greasy, all the lights in the picture will become nice glamorous star shapes. However great this effect may be when you are looking for it, it might not be what you want in a night picture.


The moon
And then we have the moon. Be careful with the moon. It depends on the weather and the availability of other light sources whether you want the moon in your picture. If it is only slightly hazy, the moon will become blurry. If the moon is the only noteworthy light source around, it will burn your highlights. In both cases, don’t shoot directly at the moon. In other cases, you can, provided that you manage to strike a balance between the light sources. You may also use the moon as a source of backlight for a well-lit building, or play around with the differences in color temperature between moonlight and artificial light.


Post processing
In post processing, do not adjust your white balance, or at least not too much. The warm colors of artificial light and the cool color of moonlight provide the typical night atmosphere you may be looking for. You might want to darken the blacks in post processing though. The darker parts in your picture may pick up some noise because of the high ISO and/or long shutter time. You can easily reduce this by squeezing the left (dark) end of your histogram a little, while keeping the middle constant. This increase contrast and darkens out most of the noise.


More resources:
String stabilizer (video tutorial)

Other alternatives for tripods

Tuesday, May 6, 2008

Photography tips: basic post processing

I know that some photographers are very reluctant to do any post processing. I am not going to tell them they are wrong. I am not going to explain that post processing is exactly what the photo lab did when they developed your film in the old days. I am not going to tell them it’s okay to correct for the minor imperfections of their gear. It’s a waste of time and energy, they will most certainly not listen. Somehow, these people got the silly idea that the 0’s and 1’s on their chip are the truth, the whole truth and nothing but the truth, and that post processing implies that the truth is altered. They will stick to this idea, and they are entitled to their mistake.

Too bad for them, they are missing out on an easy opportunity to enhance the quality of their pictures. This article describes some basic tips that help improving pictures. Nothing big, no great secrets revealed here, no magic way to recover a bad picture. In fact, post processing can hardly ever be used to make a bad pic into a good one. But you can make your nice picture pop, and have it draw attention. The article draws on the use of Photoshop Elements, but the same techniques may be used in Photoshop CS, Paint Shop Pro, Gimp and many other programs. The terms used may be slightly different though.

Increase contrast
Most lenses (except the very good ones) loose some contrast on the way from the actual thing to the picture on your chip. You will have to bring it back in post processing. Simply create a levels adjustment layer (using curves is fine too, but they require an add-on in Elements). You will now see a histogram. Check if there is some ‘empty room’ to the sides of the histogram and slide the white and black point towards the ends of the histogram. You can slide both sides up to 20 points further, depending on the steepness of the outer slopes of the histogram. The higher contrast will make the pic look stronger and sharper. Make sure to check your highlights. If they get burned, slide the white point a little further to the right or use a grey brush on the mask to apply the levels selectively.

Increase saturation
Like in the case of contrast, some lenses loose some of the color in your original. Again, you can use post processing to bring it back. You may even want to exaggerate a little, provided you have your white balance correct. Increasing saturation by 10 to 20 percent should do the trick. Like before, check your highlights. Increasing saturation may cause burning highlights as well.


Sharpen
Finally, sharpen your picture, either using USM or the simple sharpen tool. There is no fundamental difference between them. USM gives you a little more control, but I find the sharpen tool to be accurate most of the time. If you use a prime or a very good zoom, there will be no need to sharpen at full size. As soon as you resize the pic however, some sharpness may be lost, and you need to reintroduce it. You can sharpen more than once, but forget about saving a pic that is blurred by camera shake. Sharpening should be done at the final stage of post processing to prevent jpg-artifacts. This holds especially for saving (as .jpg) and resizing.


More resources:

A video on the use of levels in photoshop
Levels versus Curves
Understanding histograms
Some nice-to-know reading about photo manipulation

Wednesday, April 16, 2008

Photography tips: blown out skies

Don’t you hate it when that happens? You made a great pic and the subject of your pic is well exposed, but the sky is blown out white. It gives your picture a cheap and snapshottish feel. Why do the pros always have these great cloudy skies in their picture? More important, how do I get those as well?

Let’s first take a look at the cause of these blown out skies. They occur on overcast days, especially when a thin and even layer of clouds lays over the entire sky. The clouds work as a giant diffusion screen and you are shooting against the light whenever you have some sky in your composition. The sky will be too light compared to the rest of your image.

Composition
If you can, exclude skies from your composition or find that piece of sky where clouds are either thicker or absent. True, it’s the easiest tip to give and the hardest to execute. But try it anyway and be creative. Get closer to your subject, change your angle to have a tree or building behind it, or photograph from a high viewpoint to lower your angle.

Filters
Using filters on your camera might help, but don’t count on miracles to happen. If there is any blue in the clouds, orange or red filters may bring out the shape of the clouds. Obviously, this is useful only if you are shooting black and white. Neutral Density gradual (Nd grad) filters and polarizers may help a little. Filters –of any kind- will work bust when clouds are thin, i.e. when you can feel the sun through the clouds.

Use deep DOF and underexpose
A fairly simple thing to do is underexposure your picture. If you underexpose by about 1 stop (i.e. divide your exposure time by two), details in the clouds are more likely to become visible. Some blown out parts may remain, but at least it’s not all white. Combine the underexposure with a deep depth of field, so that the regained details are not lost in out-of-focus softness.

Better still: Bracket!
Obviously, with exposure correction, you will get the skies right, but have your subject underexposed. The best thing to do is take a couple of shots at different exposures and combine those in post processing. This does require some post processing skills though. HDR-software might come in handy too.

Fill flash
If your subject is close enough, use a flash to light your subject, allowing you to expose both the sky and your subject correctly. Depending on the type of flash and camera you’re using, you can either try to find the right amount of flash power or find the right combination of exposure time and aperture to get correct exposure of both the sky and the subject. I will devote an article to fill flash soon. ETA: done, you can find it here.

Post process
You might also want to adjust your picture after shooting it. Many people have suggested the ‘replace color’ option in Photoshop, or replacing the white with a picture of a sky. I am not too pleased with the results of these techniques. The results are okayish for small prints in the family or holiday album, but a photo enthusiast will probably want a better result. Below, you’ll find a link to a promising tutorial with a more natural looking result.

More resources

A nice PS tutorial

Wikipedia on bracketing

How to use fill flash