skip to main |
skip to sidebar
 Self portraits are among the most difficult and most rewarding types of photography. It provides you with an extremely patient model, capable of understanding all your problems and prepared to try all kinds of lighting setups and crazy ideas. He or she may not be particularly pretty or very experienced in posing, but will make up for it with flexibility, perseverance and dedication. And all of that for free, your model won’t even ask for prints. It does however require some skills and a lot of practice to get decent results from self portraits.
The basics are the same as in the case of standard portraiture. Lighting, composition and expressions work out similar as in the case of photographing someone else. Likewise, self portraits require the same post processing steps as normal portraits, provided they are the same type of portraits.
Use a tripod
Here’s a pretty obvious tip: use a tripod. Yes, you can hold your camera at arm’s length and in some cases, this will yield a great self portrait. In most cases, it will only limit your possibilities. If you don’t have a tripod, put it on top of your wish list. It will open up a new world for you. In the meantime use something that’s sturdy and horizontal and has the required height.
Use a dummy
Once you’ve put your camera on the tripod, put a dummy in the place where you will be when shooting the portrait. Autofocus on the dummy, the set your camera or lens to manual focus and don’t move the camera. When ready, replace the dummy by yourself. Use a timer or a remote to trigger the shutter.
Make it a little easier on yourself
Getting decent self portraits is hard enough as it is, so why not make it a little easier on yourself. First of all, frame the picture a little wider than you normally would. This gives you room to crop the picture afterwards if you weren’t in the exact position you should be. Likewise, do not use very wide apertures. If you do, your depth of field becomes small, and your exact position will become a very critical factor. Using a smaller aperture (higher f) will literally give you some breathing space.
I recently did a major rehaul of my online portfolio CamerA AbsurdA, but didn´t add a `about`-section at that time. Now I did. The section also includes a couple of self portraits, including a brand new one, 'Loud Guy'. So, go check it out comments welcome.
So you want to be a model photographer? The first thing you’ll need to do is build a portfolio. But how will you build a portfolio without models? And how will you find models without a portfolio? Seems like there is no way out, but there is.
 1st step: stay close
You probably know someone with a pretty face, who is willing to pose for you. Could be anyone; your sister, an uncle, someone from school, a colleague, your neighbor. If you think hard enough, you can think of someone. It does not have to be a professional model, you just need a couple of portraits that go beyond the snapshot-of-a-family-party level. Likewise, don’t use your holiday snapshots (unless they are great pics of course)
2nd step: Join a community
Once you have three or four decent pictures, join a web community for photographers and models. Well known US-examples are ModelMayhem.com and Onemodelplace.com. For my Dutch readers I recommend Dutchheaven.nl. In these communities, photographers and models (often make-up artists and stylists too) find a platform to connect to each other. Don’t just sign up and wait for things to happen. The best thing to do is approach models yourself, and arrange TFP (Time for Print) or TFCD (Time for CD) shoots. Try to aim at models slightly above your own level. Aiming lower will not get you the pictures you need to improve, whereas aiming too high is likely to lead to disappointment.
By participating in a community, you will get to work with people you don’t know. That’s a nice thing, but it is also a risk. That’s why I prefer internet communities that require photo ID to sign up. This simple threshold scares away the real idiots, but it is no guarantee.
Once you have worked with four or five different models, think about creating your own website as an online portfolio. This will give you more room for exposure and make you look more like a professional photographer. You can link from your community account to the website, and may want to put the url on your comp card as well. Meanwhile, keep working on your portfolio through TFP/TFCD shoots, gradually aiming for better models.
The alternative approach: Quickstart your career
There is a faster way to start. Instead of working your way up through TFP/TFCD shoots, you may want to invest in one or two shoots with very good models and make-up artists. This will give you a headstart when joining a community, allowing you to find better models willing to work with you on a TFP/TFCD basis. This strategy may work for photographers that are very talented or already have a broad experience in other fields of photography. For inexperienced photographers, it contains the risk that their inexperience shows in the pictures and the investment will be partly wasted. But then again, who is to reach anything without taking a risk or two?
pssst, you think this looks familiar? Very good, it means you read both modeling and photography tips. Which is wise, whether you're a model or a photographer.
Cropping, or cutting the edge from a picture in post processing, may sometimes come as a useful trick to improve your composition or to remove unwanted elements from your picture. Cropping may also be used to change the aspect ratio of your pic, and hence change its impact. The aspect ratio is defined as the ratio between the longest and the shortest side of your pic. Changing your aspect ratio has implications for the composition of your pic. Some combinations work better than others.
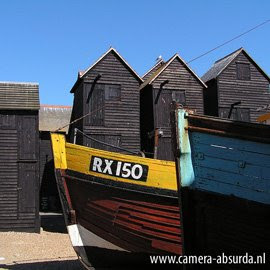 1:1
1:1
The square format is often used in medium format cameras as well as in many Lomo (often using medium format film cameras. This gives a picture a traditional feel. Depending on the pic, a professional or experimental look that the picture already had, may be enhanced by the square crop. If some site or contest prescribes a maximum size for the longest side, you may want to maximize total pic size by using the square crop. Likewise, the visibility of a square thumbnail in a large group of thumbnails is better. Square pics work well with centered compositions, spirals and portraits. For portraits, center the pic at the vertical axle, and put the eyes on 2/3rd.
3:2
The 3:2 (or 6:4) aspect ratio is commonly used for 35mm film and for some medium formats. Magazines very often use this format as well, as do many books and postcards. People will immediately recognize 3:2 as a photograph, and it will make your pic look as if it was taken with a SLR-camera. (which doesn’t mean a thing, but some people tend to equate SLR to ‘professional’). Pictures with an aspect ratio of 3:2 work great with the rule of thirds and with all composition rules using diagonals (leading lines, S-curve, vanishing point, etc).
4:3
Most modern digital compact cameras use the 4:3 aspect ratio. This ratio is also very common for TV- and computer screens. Some people have the feeling that the 4:3 landscape looks more familiar than a 4:3 portrait. This does make sense, as TVs and computer screens are hardly ever in the portrait position. Some books and magazine use the 4:3 aspect ratio in portrait though. The 4:3 aspect ratio seems to fit almost any composition.
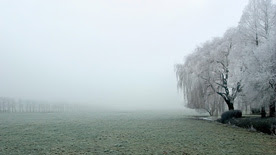 16:9
16:9
The 16:9 aspect ratio is derived from wide screen televisions and –before that- from movie theatres. No wonder it has a somewhat luxurious impact and no wonder it looks so weird in portrait. This aspect ratio goes very well with landscape shots and with shots that could have been movie stills.
More resources:
Wikipedia on aspect ratios
DPChallenge Square crop challenge results (2006)
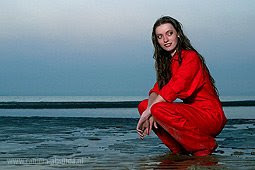 When there is not enough light to take a picture, you can use a flash. True. But it is not the whole truth. Have you ever tried using the flash during the day? It is not as silly as it may sound. In fact, in temporary fashion photography, combining flash and daylight is the rule rather than the exception.
Basic fill flash
Have you ever been shooting people in broad daylight? Did you notice the so-called ‘panda-bear effect’, with a circle of shadow around your subject’s eyes? Not a very pretty sight. Besides, a portrait where the eyes are invisible is not really a very good portrait. That’s where the fill flash comes in. It lightens up the shadows, giving you a much better portrait, as well as a little more flexibility with respect to choosing your position relative to the sun. You can either use your on-camera flash or a separate one. Harsh flash shadows, a big problem of ‘normal’ on-camera flash photography, are not really an issue, as daylight chases them away. You may want to use a ring flash, an omnibounce or a snap-on soft box to change the character of the light.
Contre jour
Now take it a step further. Since you are lighting your model’s face anyway, you might as well shoot right into the sun. Well, not really into the sun of course. Keep the sun behind your model and use your (fill) flash to light the model’s face and front. The sun now acts as a backlight, giving your model’s hair a nice glow. Normally, you would only get silhouette, but thanks to the flash, the front of the model becomes visible. With some practice you might even get to use the sun’s flare in a desirable way. This is a technique often used in modern fashion photography.
Let’s play around a little
Now we have two light sources, the sun and your flash. Having two light sources means you can change the lighting ratio. Obviously, there is no way you can adjust the sun’s strength, but there are other options. Most modern flash units are equipped with Through-The-Lens (TTL)-metering: flash metering occurs after the shutter has been opened and flash output is adjusted accordingly. The output of TTL flashes can be adjusted to cater for you specific needs as well. Check the third link below for a good tutorial of using the TTL-flash for fill.
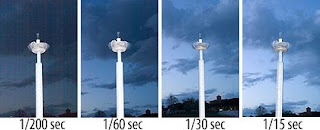
If you do not have a TTL-flash, there is another (older) way to do things. You probably know that your flash sync speed is about 1/200 to 1/250 sec. If you set a shorter shuttertime (say 1/500 sec), you’ll note a dark ban on the photograph, which is the shadow of your closing shutter curtain. But how about longer shutter speeds? They won’t affect your flash, nor the amount of flash light that falls on you picture. It does affect the amount of ambient light though. So if you want to have a brighter background (behind your flash-lit subject), expand your shutter time. For darker backgrounds, use a shorter shutter time. Depending on the strength and placement of your flash, you can even make a bright day look like twilight. Note that this trick works with TTL-flashes as well, but adjusting flash output is a lot simpler.
More resources:
A basic tutorial
Fill flash can be used in landscape photography too
Fill flash with a TTL flash
An extensive article on the TTL System (based on the Nikon version, but helpful to other brand owners as well.
The most useful tip I got during my very very early photography days was to move closer. That’s useful, too much background gives a pic a snapshottish feel, and we would like to avoid that.
 Now, let us take this tip a step further and move even closer. Move so close that the outer parts of your subject are no longer in the picture. Your subject is now filling the frame. Obviously, you can reach this result by cropping afterwards, but it’s much more fun to do it while composing your picture.
Filling the frame is the obvious thing to do when photographing a large number of small objects or a textured surface. It is also fairly common in photographing flowers, models, stills and architectural details. Why not try using it in a totally different context? Rules are only there to be broken.
 In model photography, we have the advantage that the face has a natural frame. Normally (but again, it’s okay to break rules), we would not fill the entire frame with the fac, as we would loose too many facial features. We can however fill the frame with hair (and maybe some neck), to keep the shape of the face while loosing the background entirely.
More resources:
Examples from DPChallenge’s ‘Fill the Frame III’ contest When to fill the frame and when not to
An alternative approach to filling the frame
Texture, unwanted as it may be by the ageing model, can bring pictures to life. Whether you are photographing food, objects, landscapes or character portraits, bringing out the texture in your pics adds to their realism. Bringing out texture by (over)sharpening in post procesing is bound to lead to disappointing results. Good lighting is much more effective and will make your viewers want to reach out and touch your pictures.
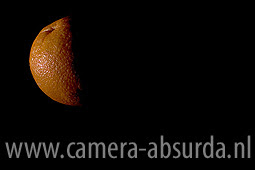 To understand how light affects texture in your pictures, you must first realize that texture basically consists of differences in hights. Take an orange for example. The skin of an orange is smooth, but is has tiny little holes all over. Now let’s light the orange from the front. The light will fill all the little holes and we will not (well, hardly) be able to see them. If we light the orange from the side however, all the little holes will be filled with shadow, and therefore show up as dark spots.
It is as simple as that: light straight from the front: almost no texture. Light from the side: vissible texture. That’s why ring flashes are so usefull in model photography. They give light straight from the front of the lens and hide most of the texture in the model’s skin better than any post processing can. But in most other type of photographs, we do want texture. So if you want some detail in your landscape shots, keep the sun to the side (which emphasizes the effect of polarizers as well, see last week's article). When you are shooting a character portrait of your grandpa, place him with one side to the window. For food photography, use at least one light source from the side to bring out the texture of the food. And for pictures of your furry pet, well, I think you know by now.
You can vary the amount of texture in two ways. With a single light source, turn your light source around the subject from front (little texture) to side (a lot of texture). If you can not move the lightsource, turn your subject. If you have more light sources available, use one from the front and one from the side and vary their relative strength (we will have an article on lighting ratio shortly) and see what happens. Experiment untill you are pleased with the result.
More resources
Using light to create texture in your photography
The importance of texture5 ways to make your texture photos pop


