Friday, October 17, 2008

Photography tips: Print Size

A question I hear quite often is "I have a camera of such-and-so-much megapixels, how large can I print?" The question is in fact fairly easy to answer, but the problem is that many people tend to loose themself in the worship of figures that are only meant to suggest quality.

Resolution: Pixels per inch
The resolution of a picture is defined by the number of pixels per inch (ppi), often also referred to as dots per inch (dpi). The latter term is incorrect, but used so often that you can safely assume that ppi is meant. The industry standard for high quality printing (glossy magazines, art books) is 300 ppi. That is allready a high number, but still you can hear people in discussion forums state that 500 or 600 is better. That is plain bullshit. You will need a magnifying glass to spot the difference between 240 and 300 ppi, so it will take a microscope to recognize any difference beyond 300 ppi. For pictures that are closely inspected, 200 to 300 ppi is the range you should be looking for.


Viewing distance
But wait. Most people posing the question from the intro pose the question because they want to make a large print. Will the large print be up for close inspection? No, large prints are looked at from a larger distance. At arms length, 100 to 150 ppi is allready fine, and if the viewer is 5-6 feet away, 70 or 80 ppi might even be okay, provided the picture itself is sharp and you use decent paper and a good printer.


Start calculating
Once you know for what purpose you will be calculating and have choosen the correct ppi, the calculation is easy. Simply divide the length and width of you picture in pixels by the ppi number you've picked, and you find the size in inches. For centimeters, multiply by 2.5. Let's say you have a 3072 x 2048 (=6 MP) picture, and you have decided to print it at 100 dpi. You print size is then 3072/100=30.72 x 2048/100=20.48 inch or 75 by 50 cm.


More resources:

Monday, October 13, 2008

For Joeri

Today I heard that my former colleague and friend Joeri Gorter was killed in an accident last Friday. Joeri (Dutch spelling for Yuri) was on a bicycle trip through the US when he was hit by a truck. This is a sad loss. I have always known Joeri as an energetic and enthusiastic guy and that's how I will remember him.

Despite the fact that Joeri's death comes way too early, I find comfort in the way he died. If you have to die, why not die doing something you love to do? This knowledge does not fill the gap Joeri leaves behind; it just softens the pain for those who remember Joeri. He left life the way he lived it: energetic and enthusiastic.

Saturday, October 11, 2008

Modeling tips: plan your career (2)

Last week's article was about setting goals, defining steps and taking action. This week, I'll discuss the evaluation of your plans and actions. Normally, you wouldn't evaluate after a week of course, so read the article now and bookmark for later use.

When?

Many people seem to wonder when they should evaluate their goals. In fact, it is pretty obvious. Remember what the "T" in S.M.A.R.T. means? Right, timely. It means that the definition of your goals include a deadline. And when the deadline is there, the moment of evaluation has come as well. Of course, if your reach a goal before the deadline, don't hesitate to evaluate before that deadline. Since all your goals are measurable, it won't be hard to note if you've reached one.


What?

Evaluation. It sounds like something very complicated for high-educated people. It's not. In fact, you do it all the time in daily life. Did I like that meal? How do I look in that dress? How much money do I have left? Was that movie any good? Answering these questions means you're evaluating. Evaluation is nothing more than posing the right questions and answering them as good as you can. It's the same with goals: Did I reach them? Why(not)? Did I follow the steps? Did I take the actions I defined? Did I take other actions instead because an opportunity came by? And so on.


Note that there are no right and wrong answers. Also note that you are not on trial. There is only one person you are evaluating for, and that is you. So be honest and serious. No socially desirable answers, you'll be fooling yourself and yourself alone.


Then what?

So, okay, I've answered the questions, now what? First of all, be happy and proud of every goal you reached. Great work, well done. Now go find new, higher, goals to follow up on your success. Second, learn from the goals you didn't reach? Why didn't you? Were they set too high? Adjust them. Were the steps insufficient? Add more steps. Didn't you work hard enough? Work harder. Was it bad luck? Are you sure? Hope for more luck next time and think of how you can increase your luck.

In short: every time you reach a goal or deadline, evaluate, learn and adjust your planning. Plans are dynamic in nature, because they involve progression. Don't be afraid to adjust your plans, be worried if there is no need to.

Thursday, October 9, 2008

Photography tips: Vanishing point

One of the main challenges in photography is trying to capture three dimensions in a two-dimensional frame. A picture, either on paper, on canvas, or an screen, has no depth. It is up to the photographer to suggest depth. Last week’s article, on shallow depth of field, showed you one way to suggest depth. This week’s article is about a composition technique called vanishing point.

I don’t know about you, but the very first thing I learned when drawing perspective, is to place a point on the horizon. All the horizontal lines in the drawing should the lead to this point. This technique creates the suggestion of perspective and hence depth. Photography is not the same as drawing obviously, but photographers use many tricks that drawers thought of first. This is one of them. The difference is that the photographer does not have to place a point on the horizon. The point is already there, the photographer only has to recognize it. How? By following horizontal lines. All horizontal lines pointing into the photo seem to lead to one point. That point is the vanishing point.

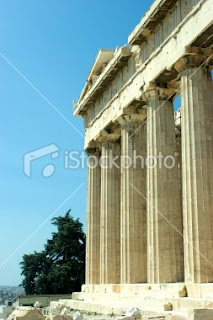
Having multiple lines aiming at a single point gives a picture depth in the exact same way as it is done in drawings. Buildings are always glad to provide horizontal lines leading to a vanishing point. The picture of the Parthenon clearly shows how it works. Similar powerful lines toward the vanishing point may be found in rails and railroads. Note that the point itself does not have to be visible. It doesn’t even have to be in the picture. The mere suggestion of the point is sufficient to give depth to your picture.

More resources
DPChallenge Vanishing point Challenge (lots of examples)

Wednesday, October 8, 2008

Forbidden Love

"O Romeo, Romeo! wherefore art thou Romeo?". Human literature is full of forbidden love. And that's just literature. I am guessing that about three quarters of all romance novels is about this subject. Not to mentions songs. And if you guys love to read and hear about it, that's probably because you recognize your own life in it.

I tried to figure out why humans care so much about forbidden love. I can guess why you care about love, but if you care, why forbid it? And even if it's forbidden, why bother? People don't care 'bout speed limits, why care 'bout love prohibition?

Here's what I found: In the early days -The Romeo and Juliet days-, love was forbidden because of class differences. Had to do with inheriting power. Well, I guess you guys found out by now how silly a reason that is. But some taboos are still left: love between coworkers, love between neighbors, love between people who are married. Not to each other that is. I will discuss the monogamy issue in a future blog article, For now, let me tell you I have not found a valid reason why two consulting adults who fall in love with each other, should not be allowed to be together.

phew, need a little rest here. Philosophy is heavy stuff and these sentences with double negations are just exhausting.

Where was I going? Oh right, just wrapping up I guess. I wanted to note that falling in love is a natural thing. Since (Spinoza) nature is God and (any religion) God should be obeyed, people should stop resisting falling in love. Didn't I already tell you to listen to your heart?

It's just a matter of logic.

Friday, October 3, 2008

Modeling tips: plan your career (1)

Have you ever noticed that most models just hope for a brilliant career, but don't have a firm plan to realize their dreams? Some models do work hard and grab any chance that comes along, but models that actually set out to reach specified goals are rare. In many types of careers, planning is common, so why not in modeling? It is a serious profession, you know? And what's more, competition is tough in the modeling world. So why not make the difference? And it's not as hard as you might think

Set goals
The first thing to do is to tell yourself where you want to be in a year, in two years and so on. Be ambitious but realistic. If you aim too low, you won't reach high. If you aim too high, you might get frustrated. Make sure your goals are S.M.A.R.T. (Specific, Measurable, Attainable, Realistic and Timely, see the link below for more information) and write them down.

Define steps
Setting goals is step one, but how do you reach them? Think. For most goals you can find out for yourself what steps are needed to reach them. If you can't, find help. Ask your agent or ask a model that has already reached a similar goal. Define your steps as actions and set deadlines for them. Note that some steps have to be carried out in a particulair order. The order and the deadlines together create something that looks like a scheme. This is your path to success, now you'll just have to follow it.

Take action
This is the hardest part for some, and the easiest for others. At some point, you will gain nothing in further planning. It's time to act. Call that agent or photographer you planned to work with. Register that url for your own website. Select the pictures for your comp card. Once you finished a step or reached a goal, mark it on your list. It's very rewarding to see the number of marked items on your list grow.

Obviously, you should not stick to your planning too tight. If an opportunity comes by that's not on your list, forget the list. Grab that opportunity! Keep in mind that planning is a tool, not a goal in itself.

Next week: part 2...

more resources:
about S.M.A.R.T.

Thursday, October 2, 2008

Photography tip: Shallow depth of field

It is my experience that the use of shallow depth of field (dof) is one of the easiest ways to impress people with your photography skills. Obviously, we're not here to impress people with our photography skills, so it's good to note that shallow dof is also a great way to isolate your subject from busy backgrounds.
The picture to the left clearly shows this latter function. Despite the fact that the background is a pretty girl with fresh-colored clothing, there is no doubt where your eyes want to go. The orange draws the attention away from the face, which would be the natural focus point in such a picture. It is the narrow dof that creates this effect. The sharpness is carefully laid in only one place in the picture. That's the 'why', now for the 'how'.
Aperture
The obvious way to create shallow dof is using a wide aperture (i.e. a small f-number). The example picture was shot at f/1.8, which obviously requires a lens capable of such a wide aperture. Do not despair if you do not have such a lens however, the effect can be reached at f/4 or f/5 as well.
Focussing distance
Your depth of field is also narrowed if you approach your subject closer. If your lens or camera is not capable of wide apertures, just move in a little closer. In macro-photography, this is even considered a disadvantage, as the extreme close focussing distances do not leave room for sufficient depth of field in the picture. I allready explained that, remember?
Focal length
Finally, focal length also influences the depth of field. The longer (more tele) the focal length of your lens is, the narrower the depth of field will be. Of course, there is a rade off between focal length and focussing distance. You can calculate the your depth of field from the website given in the link below.
Don't overdo
Some people are so impressed with the wide aperture of their lens that they use it wide open all the time. Next thing you know they start complaining about lack of sharpness in user reviews. Let's face it, using a 50 mm lens at f/1.8 at 1 meter shooting distance, leaves you a depth of field of 3 cm. Nice for an orange, but hardly suited for anything bigger. Use a dof-calculator or your good judgement to choose the aperture that keeps the larger part of your subject in focus.
More resources: